RemotePC allows you to access and manage your distant computers anytime, from any device - given that the computer has an active Internet connection and the RemotePC application installed on it. You can login to your office or home computer from anywhere, manage your files and work on your computer - as though you were sitting right in front of it. You can also invite an associate to access your computer to work on a presentation or help troubleshoot.
Computer Name: Computer Name is the default name of your computer, used to identify it for remote access. You can edit the computer name at any time.
Personal Key: Personal Key is a password set by you and acts as your computer's unique access code. It is stored only on your computer and not on the RemotePC servers.
Some things need to be kept in mind before connecting to a remote computer :
- Both the local computer and the remote computer must be connected to the Internet for remote access.
- RemotePC application should be running on both local and remote computer.
- If required, setup the firewall to allow RemotePC.
The RemotePC application is compatible with macOS El Capitan(10.11) or newer [macOS 14.0 Sonoma].
It is compatible with Intel and Apple M1 processors.
The various distributions / versions of Linux OS which are supported:
Debian-based Distro:
- Debian 9 and later
- Ubuntu 16 and later
- Linux Mint Cinnamon 18.1 and later
- KDE-based Debian Distributions like KDE Neon, KUbuntu and others
- XFCE-based Debian Distributions like Xubuntu, Mint XFCE and others
RPM-based Distro:
- RHEL 7
- CentOS 7
- Fedora 32 and later
- openSUSE 42/15
Note:
- Only 64 bit OS, along with the latest two LTS, is supported.
- Supports Headless Linux servers for Enterprise customers.
- Supports monitor-less Pi machines (32-bit).
Package extensions
- Debian Package: filename.deb
- RPM Package: filename.rpm
- openSUSE package: filename-suse.rpm
RemotePC needs a graphical display like a monitor or a dummy HDMI plug/HDMI emulator to connect to the remote device, as it displays the exact copy of the graphics card output sent by the Xorg server. A monitor or an HDMI emulator transfers the information (like a supported resolution) to the graphical display of the device. If there is no graphical display attached, there may be errors with the connection.
However, you can access PI-32 bit machines that are without monitors remotely. Ensure to reboot the machine or restart the RemotePC service after unplugging or removing the monitor.
RemotePC CLI application can be used on headless systems without GUI. Click here to download.
Steps to install:
Install the downloaded build via below command:
-
For Debian:
$ sudo apt-get install ./remotepc-cli.deb -y -
For RPM:
$ sudo yum install ./remotepc-cli.rpm -y -
For SUSE:
$ sudo zypper install ./remotepc-cli-suse.rpm
-
For Debian:
Deploy For Enterprise accounts:
$ remotepc-cli deploy <deployment_code>
Deployment code is available in the Enterprise login page, which is unique for each login.
Setup For SOHO, Team, and Consumer Accounts:
-
Run the below command once the installation is completed:
$ remotepc-cli login
Enter the email ID, password and personal key one after another.

- Once the necessary information is added, the host automatically configures and appears online.
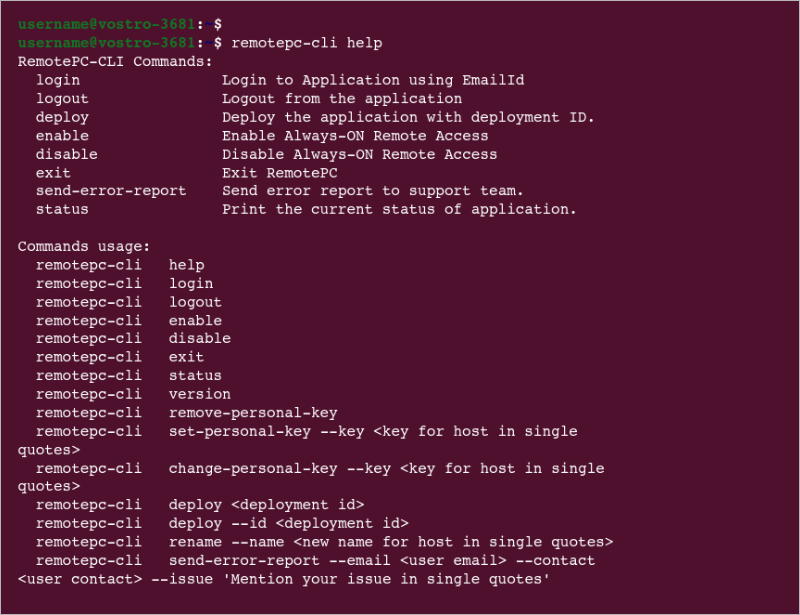
Here are the list of operations you can perform using RemotePC:
Run the below command to perform these operations:
$ remotepc-cli help
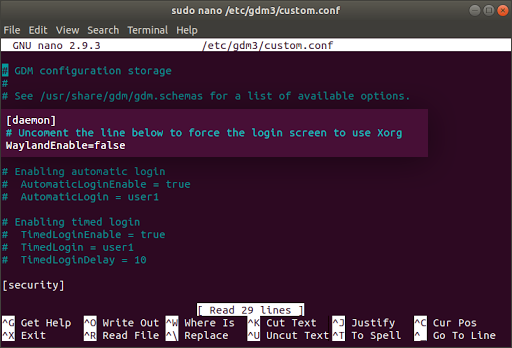
To avoid the remote Linux machine from going offline after a reboot, you need to ensure that the line "WaylandEnable=false" is uncommented (initial '#' is removed) from any of the following files available on your remote Linux machines:
- General: /etc/gdm/custom.conf OR /etc/gdm3/custom.conf
- Specific to Debian OS: /etc/gdm/daemon.conf OR /etc/gdm3/daemon.conf
Once done, reboot your Linux machine to make the changes effective.
Note: The reboot functionality is supported only on RemotePC version 3.0.0 and above.
Yes, you can remotely access your Raspberry Pi devices with the RemotePC application.
Visit the RemotePC download page to install and configure RemotePC package on your Raspberry Pi devices.
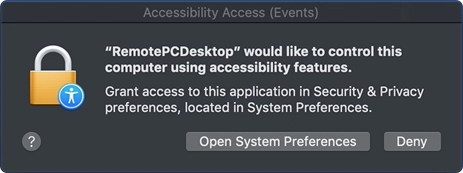
Yes, Mac OS Mojave requires user consent for applications to access privacy sensitive data. Hence you need to grant accessibility permissions to RemotePC, in order to remotely access your computers.
To pre-authorize RemotePC,
- Choose 'Open System Preferences' from the popup which appears when you try to remotely access a Mac or from the Apple menu. You will be redirected to 'Security and Privacy' preferences.
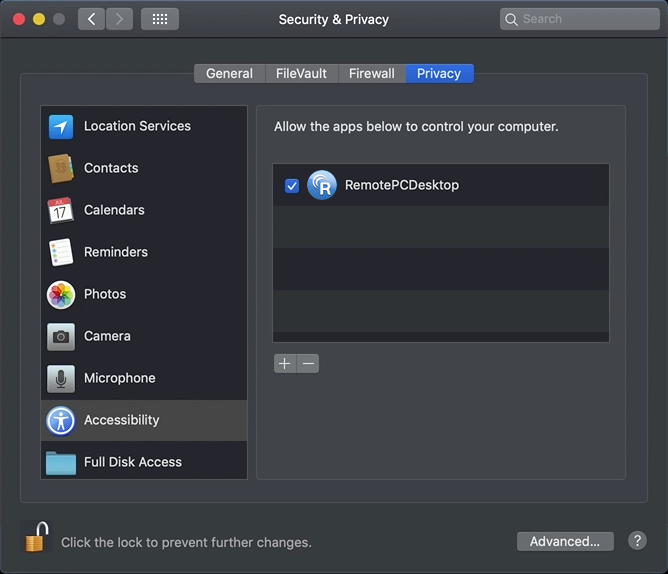
- Select 'Accessibility' under 'Privacy' pane.
- Click
 and provide system authentication to allow changes.
 - Select the checkboxes next to RemotePC related apps, e.g. RemotePCDesktop, RemotePCView.
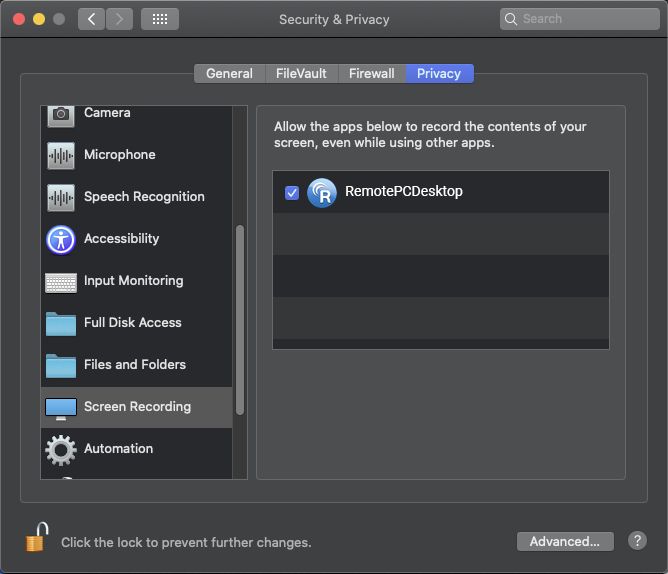
The Mac OS Catalina requires user consent for applications to record the content of their screen, even while using other apps. Hence you need to grant screen recording permissions to RemotePC.
To pre-authorize RemotePC,
- Open System Preferences and go to 'Security & Privacy' pane.
- Select 'Screen Recording'.
- Click
 and provide system authentication to allow changes.
- Select the checkbox next to 'RemotePCDesktop'.
On trying to install the RemotePC Windows application I'm getting the message "The App You're Trying To Install Isn't A Microsoft-Verified App". What should I do?
If you try to install the RemotePC Windows application and get the notification 'The App You're Trying To Install Isn't A Microsoft-Verified App', you must change app recommendation settings to disable the notification.
To change the policy for installing apps:
- Click
 >
>  .
. - Click 'Apps' in the 'Settings' window.
- In 'Apps & Features', select 'Anywhere' in the 'Choose where to get apps' dropdown.
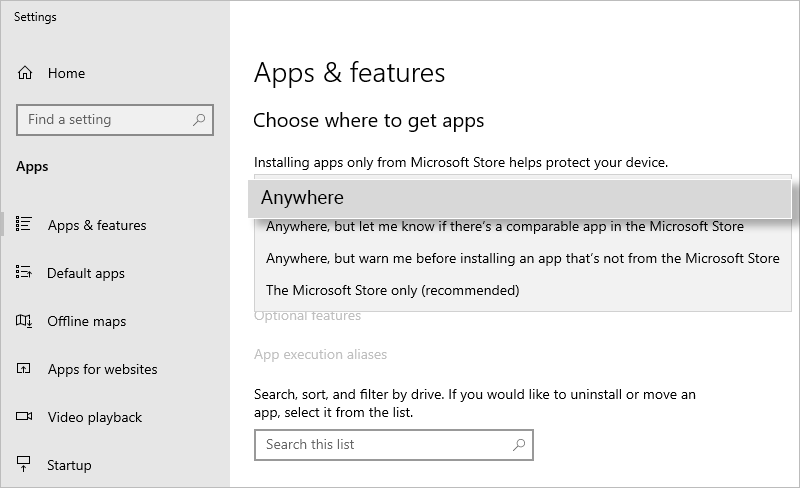
- Close the 'Settings' window to save the changes.
- If on installation, you get the message click 'Install anyway' to proceed.
Note: This setting can be modified by an administrator only.
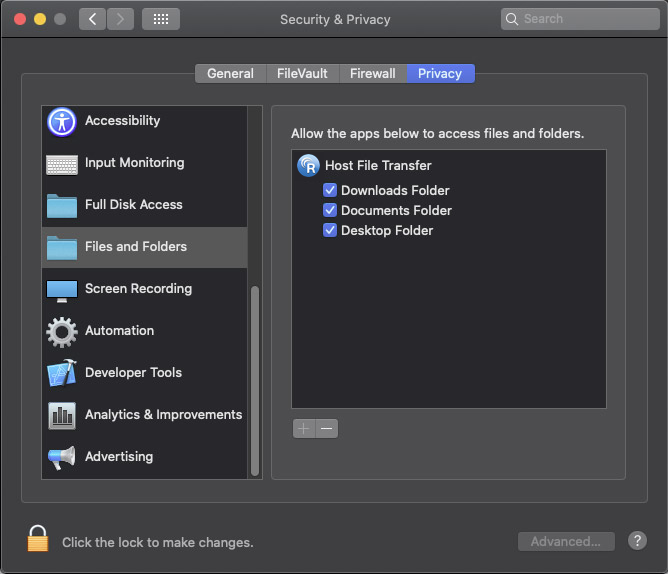
The Mac OS Catalina requires user consent for applications to access the content of their system, even while using other apps. Hence you need to grant screen recording permissions to RemotePC.
To pre-authorize RemotePC,
- Open System Preferences and go to 'Security & Privacy' pane.
- Select 'Files and Folders'.
- Click
 and provide system authentication to allow changes.
- Select the checkbox listed under 'Host File Transfer'.
For Mac OS Ventura 13.0, RemotePC background items application has to be manually enabled.
NOTE: Enable these background items for RemotePC to function. If they are disabled, RemotePC will not work properly.
Here are the steps to enable RemotePC,
- Click on the RemotePC related notifications with the title 'Background Items Added'. You will be redirected to the 'Login Items' window.


- In the 'Login Items' screen under 'Settings', enable 'IDrive Incorporated' under 'Allow in the Background'.
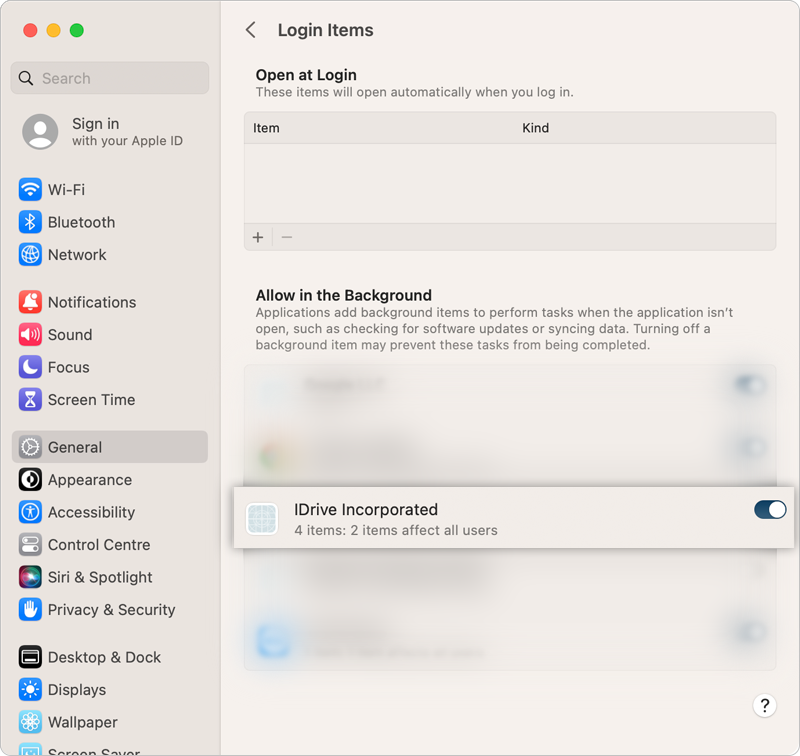
- This enables the RemotePC related items/applications to launch.
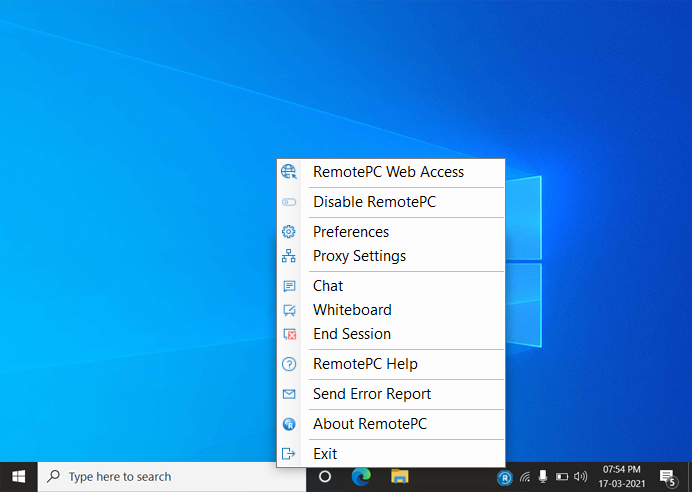
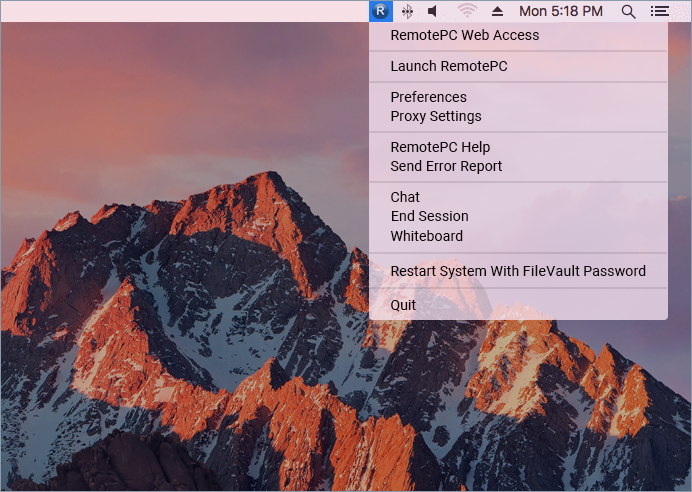
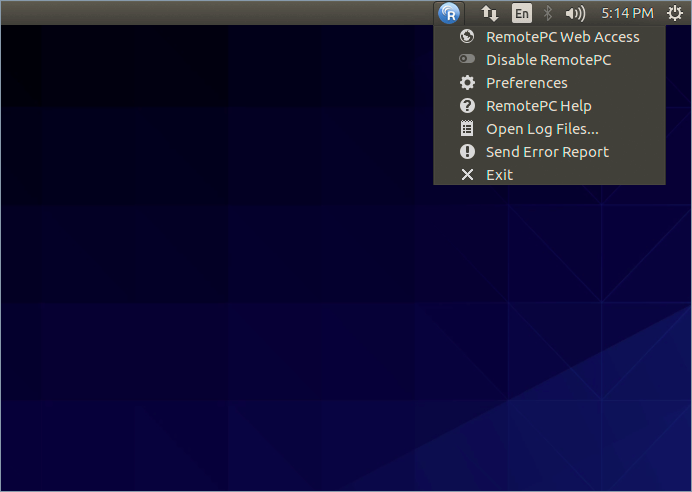
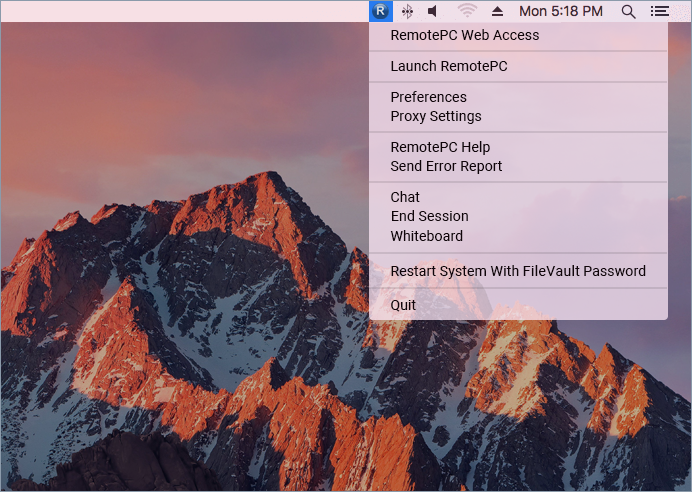
On installation, RemotePC creates a tray icon on your computer. Right-click the icon and a menu appears.
For Windows:
When logged in:
- RemotePC Web Access: Log in to your RemotePC web account
- Enable RemotePC: You can enable the RemotePC application
- Preferences: Manage wallpapers, themes, fonts etc and change the proxy settings
- Proxy Settings: Configure the proxy settings to use the RemotePC application
- Chat: Communicate with users via text messages.
- End Session: End the session securely.
- Whiteboard: Collaborate effectively with the whiteboard panel.
- RemotePC Help: An online help guide for RemotePC
- Send Error Report: Contact RemotePC support team for queries, suggestions or feedback
- About RemotePC: View your RemotePC version, release date, etc.
- Exit: Exit from the application
When logged out:
- RemotePC Web Access: Log in to your RemotePC web account
- Proxy Settings: Configure the proxy settings to use the RemotePC application
- RemotePC Help: An online help guide for RemotePC
- Send Error Report: Contact RemotePC support team for queries, suggestions or feedback
- About RemotePC: View your RemotePC version.
- Exit: Exit from the application
For Mac:
When logged in:
- RemotePC Web Access: Log in to your RemotePC web account
- Launch RemotePC: Opens the RemotePC application
- Preferences: Manage wallpapers, themes, fonts etc and change the proxy settings
- Proxy Settings: Configure the proxy settings to use the RemotePC application
- RemotePC Help: An online help guide for RemotePC
- Send Error Report: Contact RemotePC support team for queries, suggestions or feedback
- Chat: Communicate with users via text messages.
- End Session: End the session securely.
- Whiteboard: Collaborate effectively with the whiteboard panel.
- Restart System With FileVault Password: Restart the mac system with FileVault securely.
- Check for updates: Allows you to check the available updates of the application
- Quit: Exits the application
When logged out:
- RemotePC Web Access: Log in to your RemotePC web account
- Launch RemotePC: Opens the RemotePC application
- Preferences: Manage wallpapers, themes, fonts etc and change the proxy settings
- Proxy Settings: Configure the proxy settings to use the RemotePC application
- RemotePC Help: An online help guide for RemotePC
- Send Error Report: Contact RemotePC support team for queries, suggestions or feedback
- Quit: Exits the application
For Linux:
When application is launched:
- RemotePC Web Access: Log in to your RemotePC web account
- Enable/Disable RemotePC: You can enable or disable the RemotePC application
- Preferences: Enable 'Send Key Combination', lock remote screen on session end, and manage display quality
- RemotePC Help: An online help guide for RemotePC
- Open Log Files: View all the logs of the remote sessions
- Send Error Report: Contact RemotePC support team for queries, suggestions or feedback
- Exit: Exit from the application
When application is closed:
- Launch RemotePC: Opens the RemotePC application
- RemotePC Web Access: Log in to your RemotePC web account
- Preferences: Enable 'Send Key Combination', lock remote screen on session end, and manage display quality
- RemotePC Help: An online help guide for RemotePC
- Open Log Files: View all the logs of the remote sessions
- Send Error Report: Contact RemotePC support team for queries, suggestions or feedback
- Exit: Exit from the application
Note: For Linux Enterprise hosts, you can enter 'Remotepc-host help' in the Command-line interface to view the list of operation commands.
There are different states of RemotePC, which you can identify by the color your RemotePC tray icon turns into.
| States | Windows | Mac |
| Not signed in to RemotePC | ||
| Signed in to RemotePC, Remote access not configured |  Indicates your computer is disconnected. Indicates your computer is disconnected. |
 Indicates your computer is disconnected. Indicates your computer is disconnected. |
| Signed in to RemotePC, Remote access configured |  Indicates your computer is ready for remote session. Indicates your computer is ready for remote session. |
|
| Remote session in progress |  Indicates your computer, which is configured for remote access, is connected. Indicates your computer, which is configured for remote access, is connected. |
 Indicates your computer, which is configured for remote access, is connected. Indicates your computer, which is configured for remote access, is connected. |
To restart a remote computer,
- Launch the RemotePC application and log in.
- Right-click the computer name and click 'Restart'.
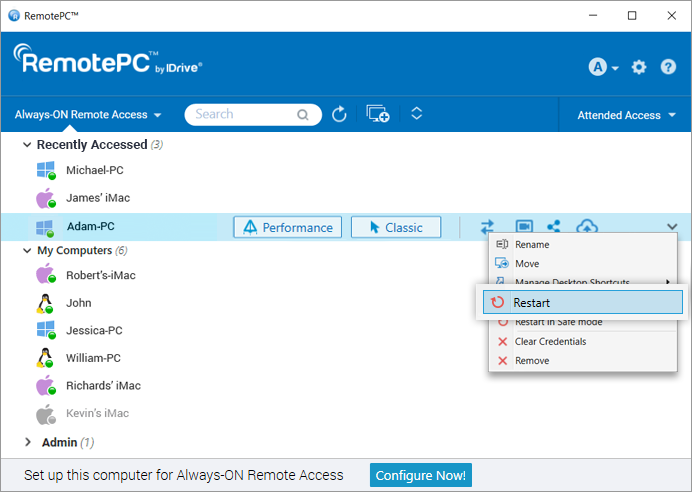
Your computer will go offline briefly, but once the computer becomes ready for remote connection, its status will change to online. Refresh the computer list manually to see the change.
Note: For Windows machines, an additional option to 'Restart in safe mode' will also appear.
FileVault is enabled on Mac systems to encrypt the data for preventing unauthorized users from accessing the system.
To restart a Mac system where FileVault enabled,
- Launch the RemotePC application and establish connection with the Mac system.
- Click on the RemotePC tray icon and select 'Restart System With FileVault Password'.
- Enter the administrator 'User Name' and 'Password' and click 'OK'.
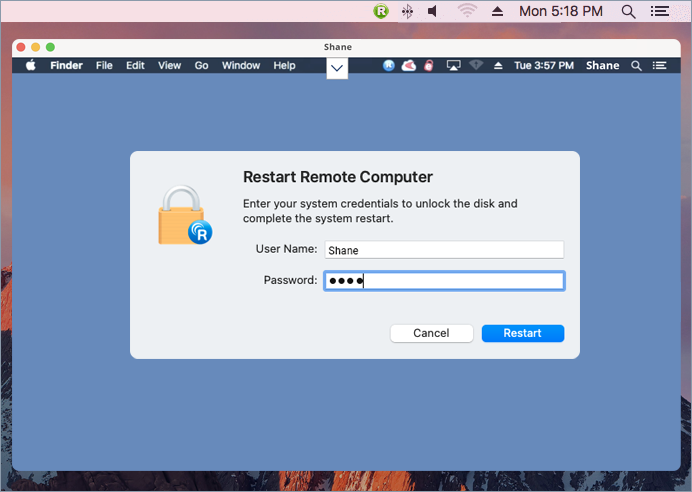
- The system will securely restart.
NOTE: When FileVault is enabled, remote restart via RemotePC can be performed only using the 'Restart System With FileVault Password' option.
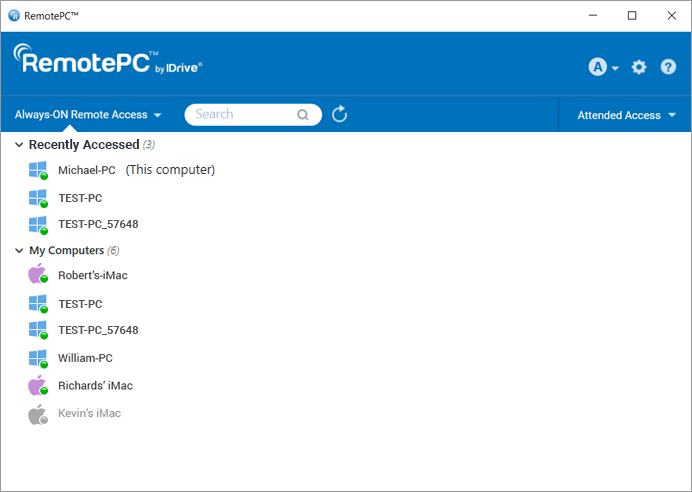
RemotePC supports VMs or cloned machines and treats them like different machines/hosts. The cloned machines have the exact same configuration as the parent machines. To differentiate between the parent and clone machines, the clones have the same name as parent suffixed with 5 random digits.
Eg: If the parent machine "TEST-PC" is cloned, you will see 2 machines in the Computer list - "TEST-PC" and "TEST-PC_57648".
For Windows and Mac:
To get started, download the RemotePC application and install it on your computer.
Once you setup and run the application, you will be redirected to the login page. Login to your RemotePC desktop app, and configure your computer for remote access.
For Linux:
To get started,
- Download the required RemotePC for Linux package depending on the distribution of the Linux OS on your computer.
- Open the installer by double-clicking or right-clicking on the package.
- Select the package manager, e.g. Open with Ubuntu Software Center, to install it on your computer.
- You can also run the following commands to install the packages:
- Debian:
$ sudo apt update
$ sudo apt upgrade
$ sudo apt install ./remotepc.deb # For RemotePC App
$ sudo apt install ./remotepc-host.deb # For RemotePC Host App
$ sudo apt install ./remotepcviewer.deb # For RemotePC Viewer App
- For RPM:
$ sudo yum update
$ sudo yum upgrade
$ sudo yum install ./remotepc.rpm # For RemotePC App
$ sudo yum install ./remotepc-host.rpm # RemotePC Host App
$ sudo yum install ./remotepcviewer.rpm # RemotePC Viewer App
- For SUSE:
$ sudo zypper update
$ sudo zypper upgrade
$ sudo zypper install ./remotepc-suse.rpm # For RemotePC App
$ sudo zypper install ./remotepc-host-suse.rpm # RemotePC Host App
$ sudo zypper install ./remotepcviewer -suse.rpm # RemotePC Viewer App
Note: Use 'dnf' if 'yum' is not available. - On successful installation, launch the desktop app on your computer by either of the below:
- Type 'remotepc' from the command line.
- Click the RemotePC icon (Activities -> RemotePC)
You can now login and configure your Linux machine for Always-ON Remote Access.
To configure your computer for Always-ON Remote Access,
- Launch the RemotePC application and login.
- On the RemotePC home screen, click 'Configure Now!'.
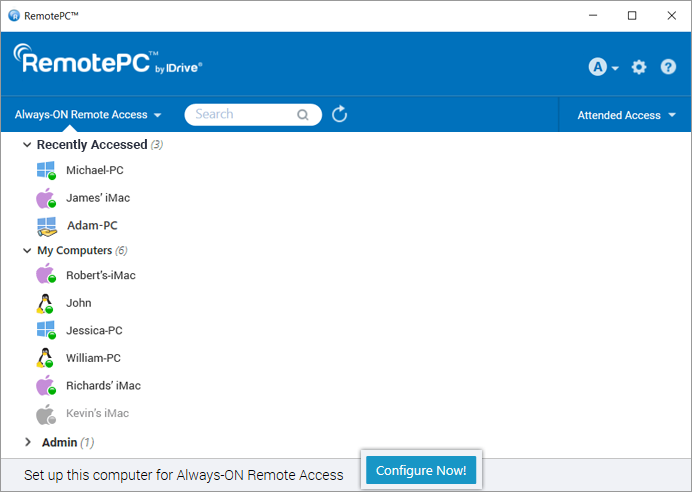
- Set 'Computer Name' and 'Personal Key' for your computer.
Note: As Personal Key is optional for Enterprise users, they will not be asked to assign a key while configuring a computer for the first time. However, if you want to set a Personal Key refer FAQ.
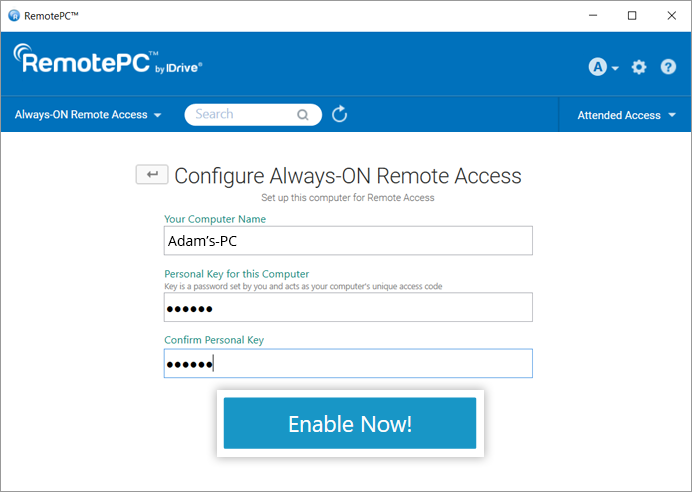
- Click 'Enable Now!'.
Your computer is now configured and will appear on the app home screen. You can access it from any distant computer.
You need to configure your computers for remote access to connect to them from anywhere.
To access a configured computer,
- Launch the RemotePC application and log in.
- Your configured computers appear under 'Always-ON Remote Access'.
Note: You can filter the list of computers based on their status, by clicking .
. - Click 'Performance' against an online computer to connect via the Performance Viewer.
Alternatively, click 'Classic' to connect via the Classic Viewer.
If you wish to just transfer files, click .
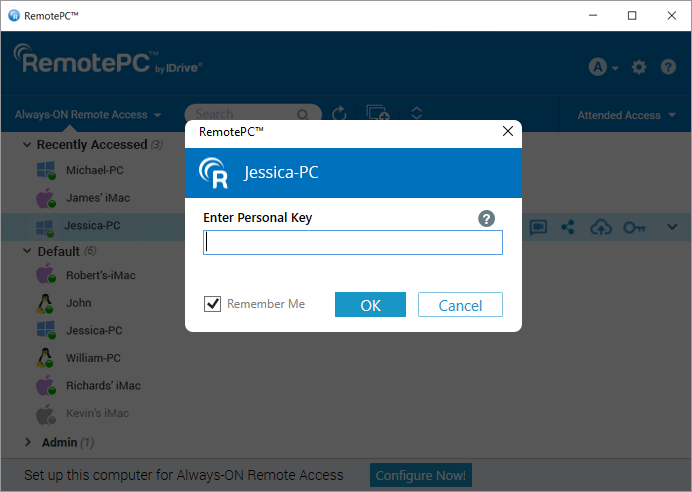
. - Enter Personal Key and click 'OK'.
A remote access to the computer is established.
Yes, multiple connections can be simultaneously established with the same computer.
If multiple connections are established, the status 'Remotely accessed by' will be displayed under 'Always-ON Remote Access' in the RemotePC application on that computer.
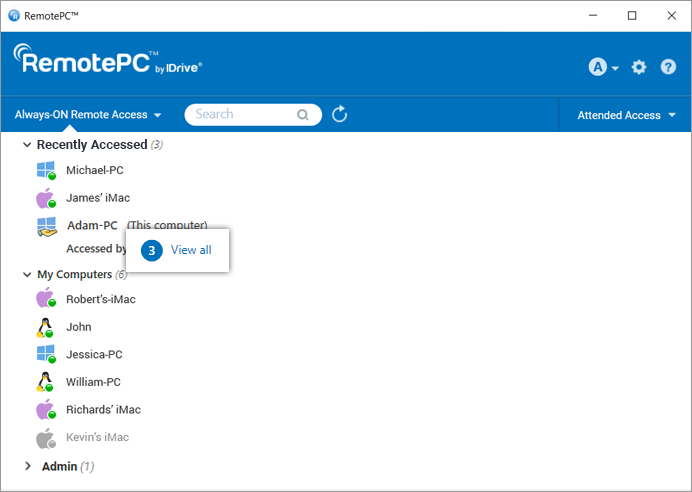
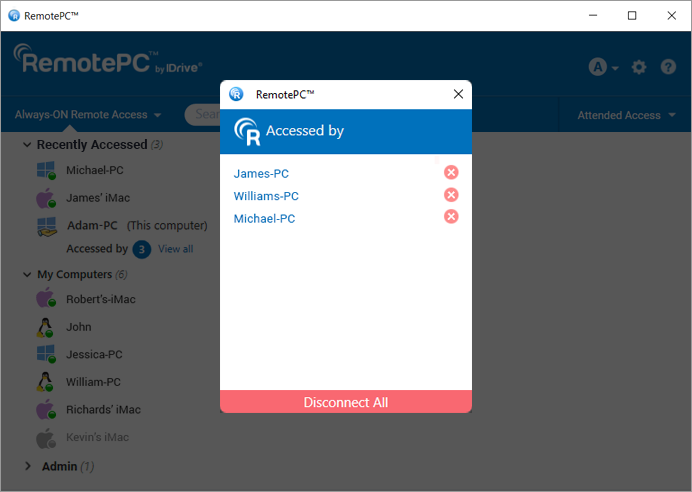
Click 'View All' to see the list of machines currently accessing the computer. Click ![]() to disconnect a connection or click 'Disconnect All' to disconnect all connections to the computer.
to disconnect a connection or click 'Disconnect All' to disconnect all connections to the computer.
Connect via Performance or Classic Viewer and enter Personal Key (if configured) to establish remote connection simultaneously.
Yes, you can access your Mac from a Windows or Linux computer and vice-versa. You can also access a remote computer from your iPhone/iPad or Android device.
To connect to a specific ongoing active RDP session on your remote Windows server machine using RemotePC,
System Requirements
- Windows Server
- RemotePC Application for Windows ( and above)
Steps to Follow
- Launch the RemotePC application and login.
- Connect to the required online remote servers and establish connection.
- Click 'Connection' in the session toolbar and click 'RDP Session List'.
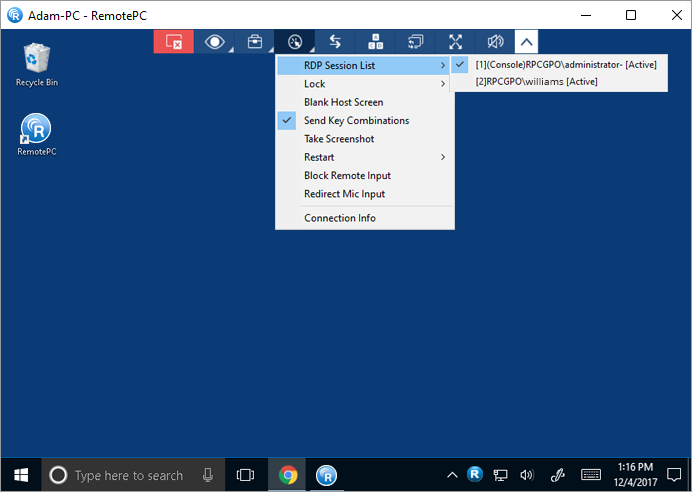
A list of all the live RDP session(s) will appear on screen.
- Click on the required RDP session to switch to it.
Note: This feature is only available for Windows.
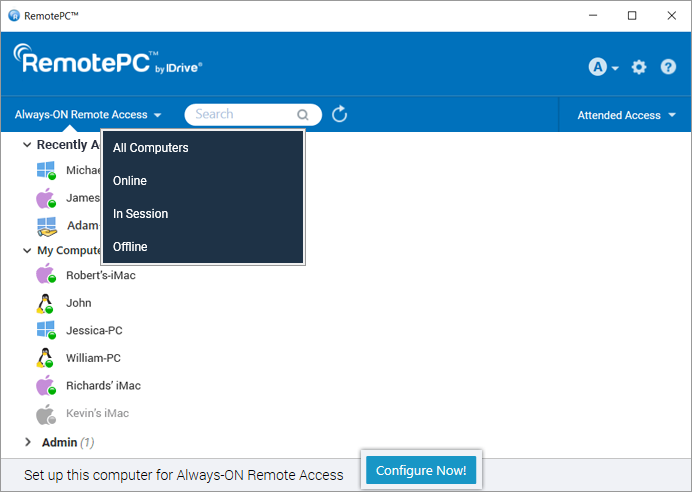
'Always-ON Remote Access' tab displays the list of computers configured for remote access, and their current status. You can filter computers in the list based on their status.
All Computers/Groups - Displays the list of all the computers configured to your account.
Online - Displays the list of computers that are ready for remote session.
In Session - Displays the list of computers which are in an active remote session.
Offline - Displays the list of computers that either do not have any active Internet connection or the remote access configuration has been disabled on it.
To reset the Personal Key,
- Launch the RemotePC desktop application on the computer you wish to reset the key.
- Log in to your account.
For Enterprise plan:
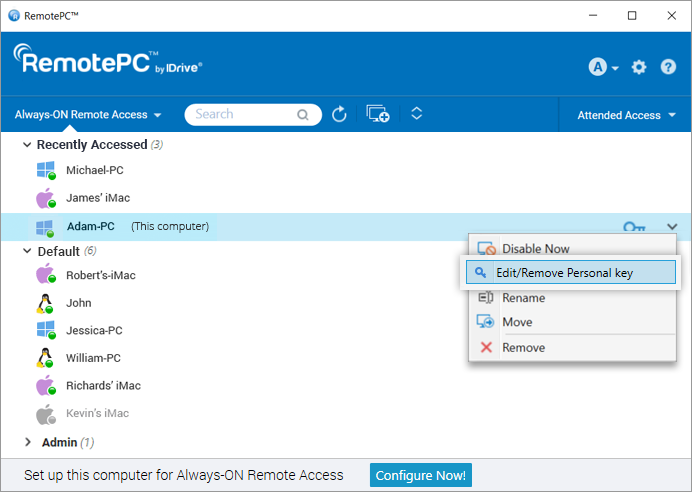
- Right-click your computer name and click 'Edit/Remove Personal Key'.
- Enter the new Personal Key and confirm the same.
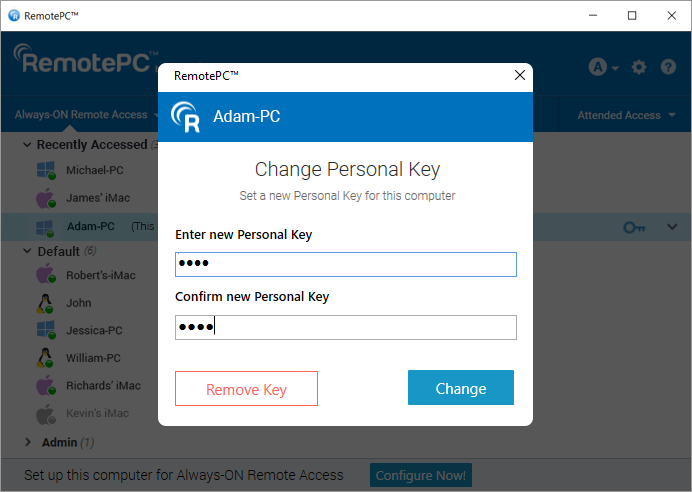
- Click 'Change' to change the personal key 'Remove Key' to remove the personal key.
For SOHO, Consumer, and Team plan:
- Right-click your computer name and click 'Change Personal Key'.
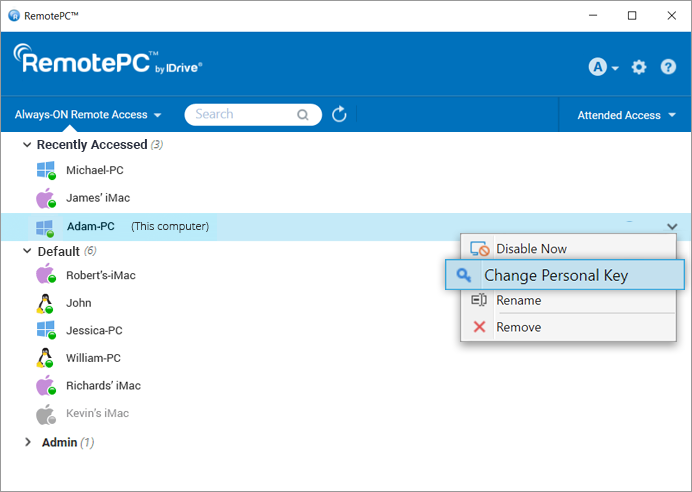
- Enter the new Personal Key and confirm the same.
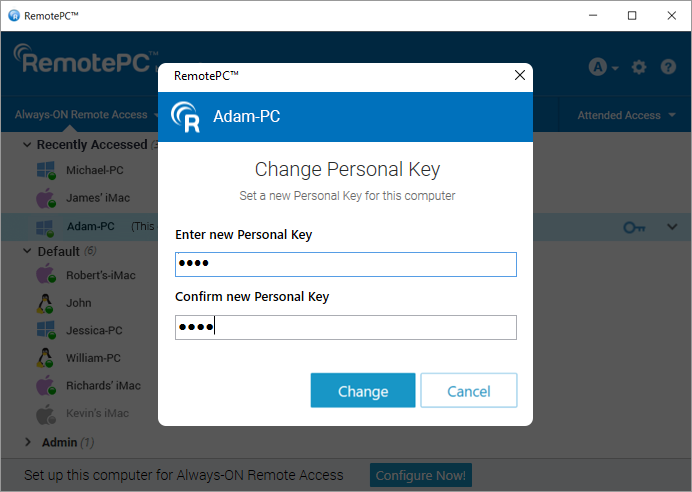
- Click 'Change' to change the personal key.
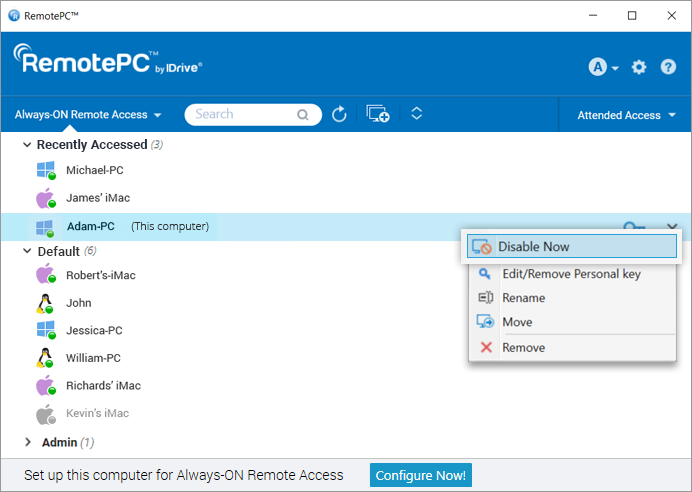
Alternatively, you can also reset the Personal Key by disabling the Always-ON Remote Access for the computer, and then reconfiguring it again. To disable and reconfigure,
- Right-click on the computer you wish to reset the Personal Key and click 'Disable Now'.
- Click 'Yes' in the confirmation window.
- Once 'Always-ON Remote Access' is disabled, click 'Configure Now!' on the home screen.

- Enter the new Personal Key and confirm the same.
- Click 'Enable Now!'.

To record remote sessions automatically,
- Log in to the RemotePC application.
- Click
 displayed on the top-right corner.
 - Go to the 'Advanced' tab.
- Under 'Session Recording', click 'Enable auto-recording of all remote sessions'.
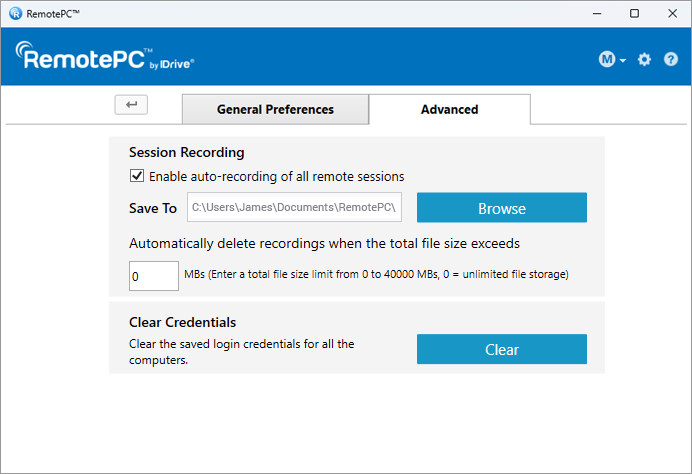
- Click 'Browse' and select the destination to save the recording. If there are no folders created or accidental deletion of folders, a default folder will be created for saving the recordings.
The remote sessions will automatically be recorded at the beginning of the session and saved under in the selected destination.
You can limit the file size to be stored for recordings under 'Automatically delete recordings when the total file size exceeds'.
To clear stored credentials for a computer,
- Launch the RemotePC application and log in. Your configured computers appear under 'Always-ON Remote Access'.
- Right-click on any online or in-session computer under 'Always-ON Remote Access' and click 'Clear Credentials'.
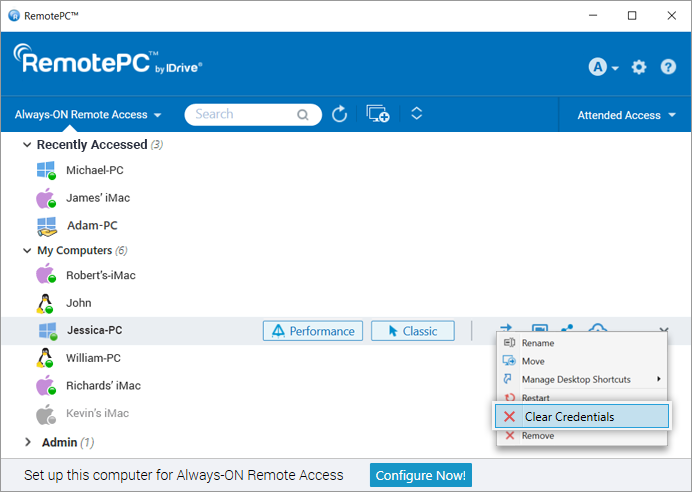
- Click 'Yes' to confirm. The saved credential for the computer will be cleared.
To clear credentials for all the computers,
- Log in to the RemotePC application.
- Click
 displayed on the top-right corner.
 - Go to the 'Advanced' tab.
- Under 'Clear Credentials' click 'Clear'.
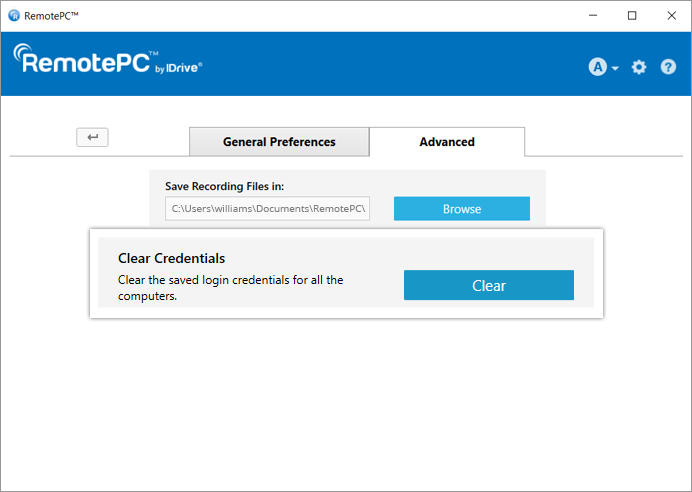
- Click 'Yes' to confirm. All saved computer credentials will be cleared.
Yes, users of SOHO and Team plan accounts can share a configured computer with other users for remote access.
To share a computer, click ![]() corresponding to the required computer, enter the email address of the intended RemotePC users, and click 'Share'.
corresponding to the required computer, enter the email address of the intended RemotePC users, and click 'Share'.
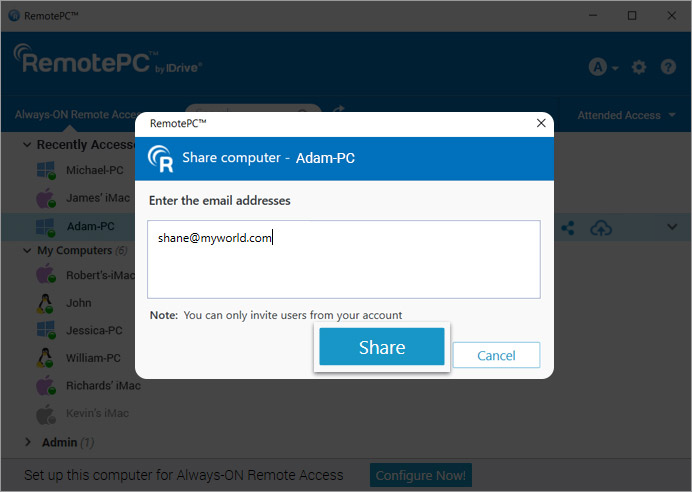
The recipients will be able to remotely access the shared computer.
Note:
- You can share a computer only with users from your RemotePC account.
- Users will only be able to access the shared computer remotely. They will not be able to make any modifications to the computer settings.
To stop sharing a computer with a particular user, click 'Share' to open the 'Share Computer' popup, and click 'Remove' next to the user.
To stop sharing the computer with all users, click 'Remove All'.
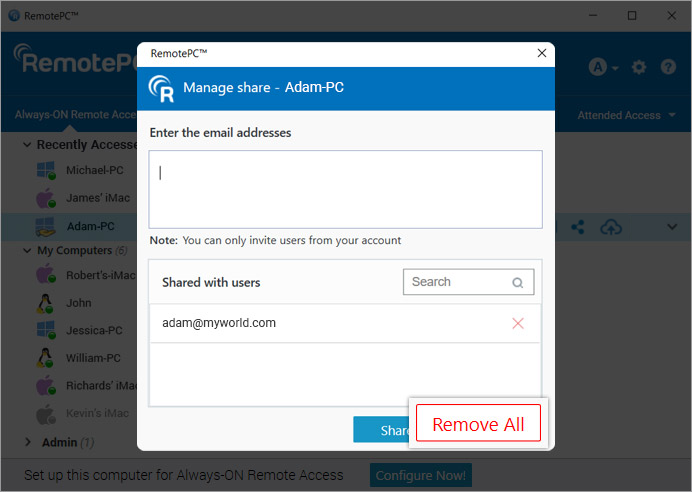
Yes, you can scale the remote computer's desktop screen to fit within your local computer window, as by default the RemotePC desktop screen does not auto fit to your local computer window.
For Windows:
To scale the remote computer desktop screen within your local computer window,
- Launch the RemotePC application and log in.
- Connect to an online remote computer and establish connection.
- From the application menu, click
 to view the remote machine in full screen mode.
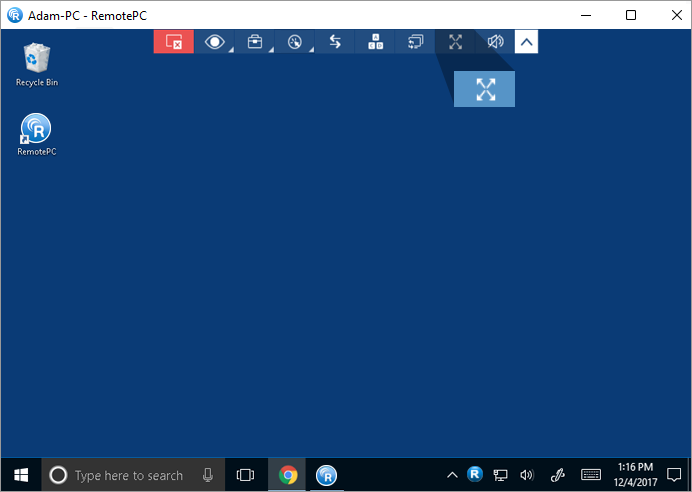
- Click
 and click 'Best Fit'. This will resize the remote computer desktop screen to fit within the local computer window.
 - To revert the changes, click
 > 'Original Size'.
For Mac and Linux:
To scale the remote computer desktop screen within your local computer window,
- Launch the RemotePC application and log in.
- Connect to an online remote computer, and establish connection.
- From the application menu, click
 to view the remote machine in full screen mode.
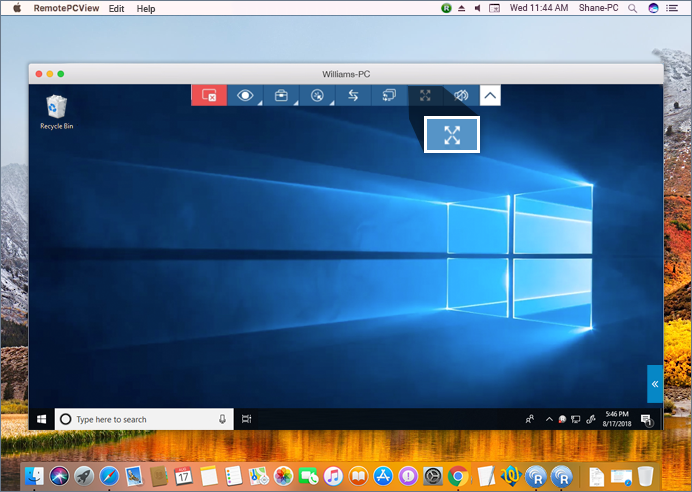
- Click
 > and click 'Best Fit'. This will resize the remote computer desktop screen to fit within the local computer window.
 - To revert, click
 > 'Original Size'.
Yes. If your remote computer has more than one monitor, the RemotePC app allows you to switch between multiple screens.
For Windows,
- Launch the RemotePC application and log in.
- Connect to an online remote computer, and establish connection.
- On the application menu, click
 to switch between multiple monitors of the remote computer.
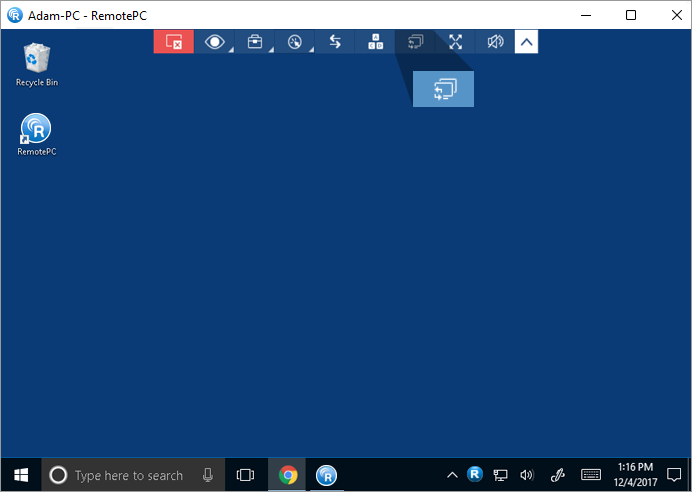
For Mac,
- Launch the RemotePC application and log in.
- Connect to an online remote computer, and establish connection.
- Click
 on the top-right corner of the screen to switch between multiple monitors.
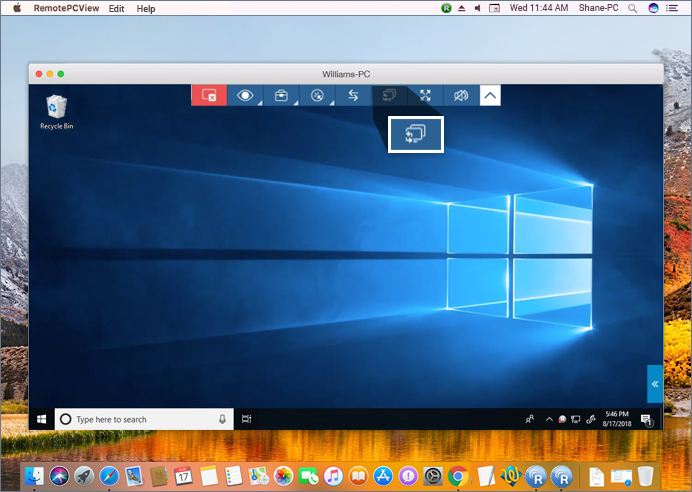
You can also view a single monitor of the remote computer. From the application menu, go to 'View' and click on the required monitor to view that individual monitor. You can also change the screen resolutions for individual monitors from here.
If you are remotely accessing a device with multiple monitors, RemotePC allows you to view multiple remote screens in a single screen at the same time, or view each monitor on a different screen.
- To view each monitor on a different screen, from the application menu, go to
 and click 'All Monitors (Multiple Window)'. Each monitor of the remote computer will appear on a different screen and individual monitors can be accessed by clicking the respective screen.
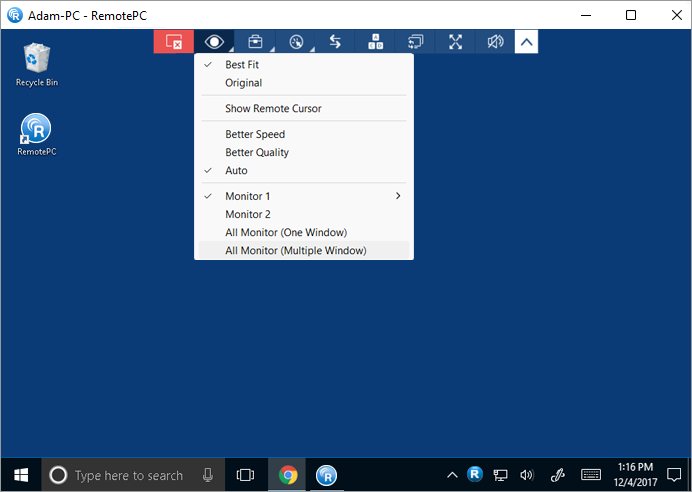
- To view all the monitors in a single screen, from the application menu, go to
 and click 'All Monitors (One Window)'. All the screens of the remote computer will appear in the same screen.
For Linux:
- To view all the monitors on a single screen, from the application menu, go to
 and click 'Monitors' -> 'Show All Monitors'. All the screens of the remote computer will appear on the same screen.
 - To view an individual monitor, go to
 , click 'Monitors' and select the monitor you wish to view.
Yes, you can transfer files/folders between local and remote computers or vice versa. Make sure the latest versions of RemotePC application is installed on both the computers.
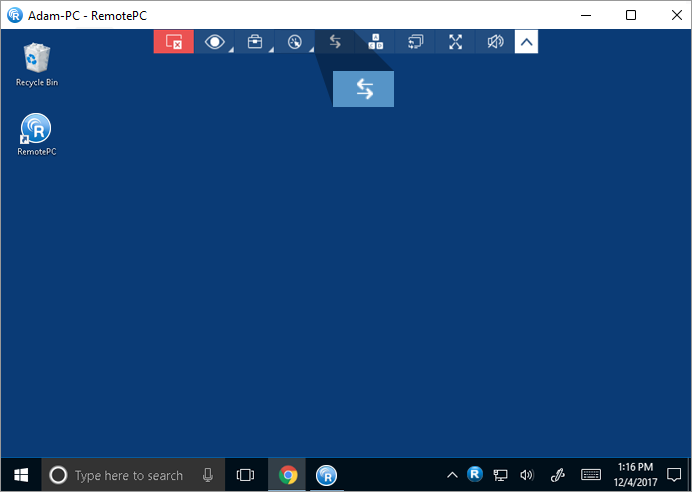
There are two ways to transfer files between any remote and local computer:
- During a live remote session, go to the application menu; click
 .
.
- On the 'Always-ON Remote Access' tab, click
 beside the computer you wish to transfer the files. If you are connecting to a device for the first time, a personal key prompt will appear. Enter the personal key and click 'Connect'.
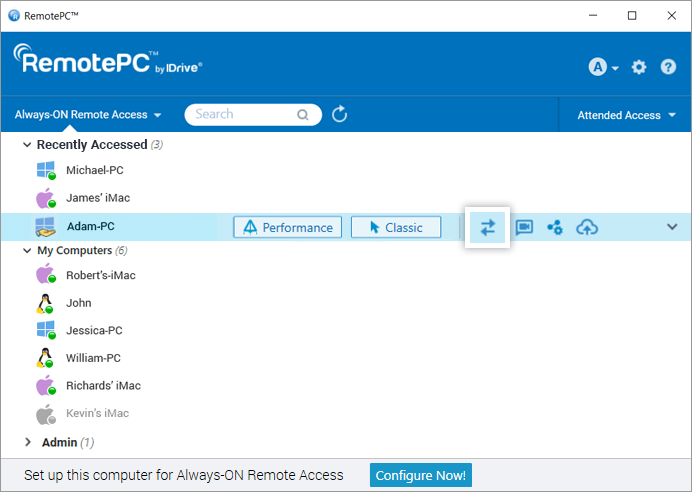
To transfer files / folders without starting a remote session,
- Launch the RemotePC application and login.
- Click
 beside the computer you wish to transfer files.
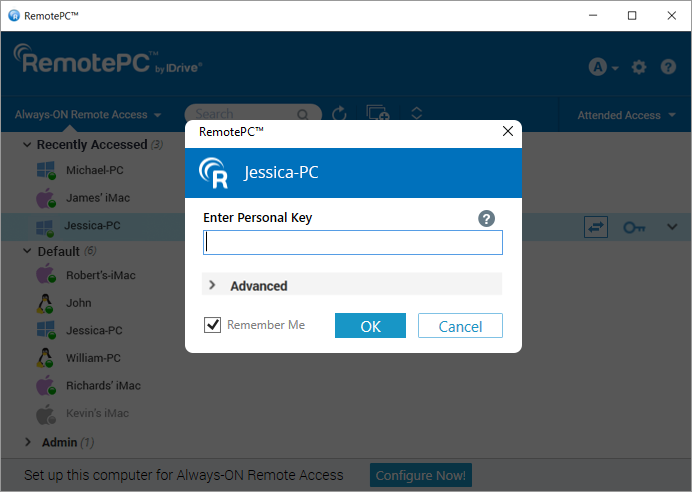
- Enter Personal Key and click 'Connect'.
- The File Transfer window appears.
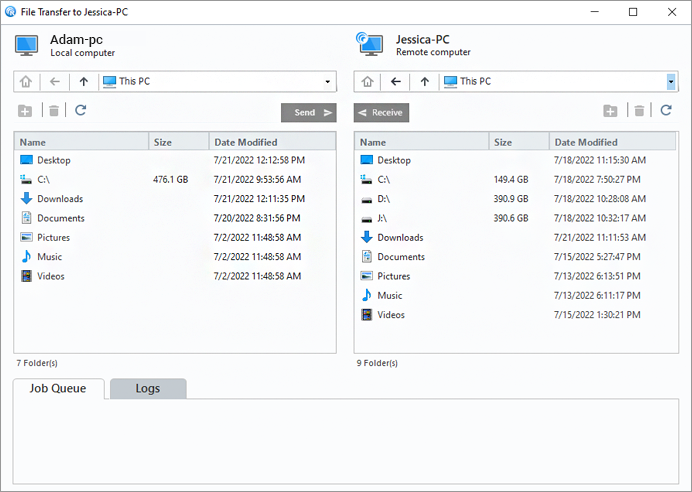
- To send files / folders from your local to remote computer, from the Local Computer drop-down menu, select files / folders you want to send, and click 'Send'.
- To receive files / folders from the remote to your local computer, from the Remote Computer drop-down menu, select files / folders, and click 'Receive'.
- The progress of the transfer is shown in the 'Job Queue' section.
Yes, you can chat with your partner at the remote end during a remote session.
To start a chat,
- Launch the RemotePC application and log in.
- Connect to an online remote computer, and establish connection.
- From the application menu, click
 .
. - Click 'Chat'. The Chat screen appears.
- Enter your message in the 'Type your chat below:'/'Enter your text below' field and click 'Send'.
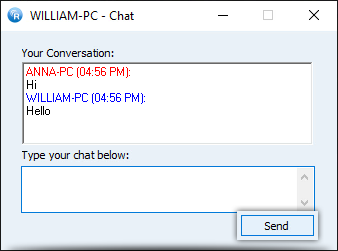
Alternatively, you can start a chat via the RemotePC Tray. Click 'Chat' on the RemotePC Tray options and the chat screen will appear.
Note: The conversation between the local and remote computer is displayed in 'Your Conversation'/'Your chat conversation' field.
Yes, you can chat via video with remote users.
To begin the video chat,
- Launch the RemotePC application and log in.
- Click
 corresponding to the computer you wish to communicate with via video chat.
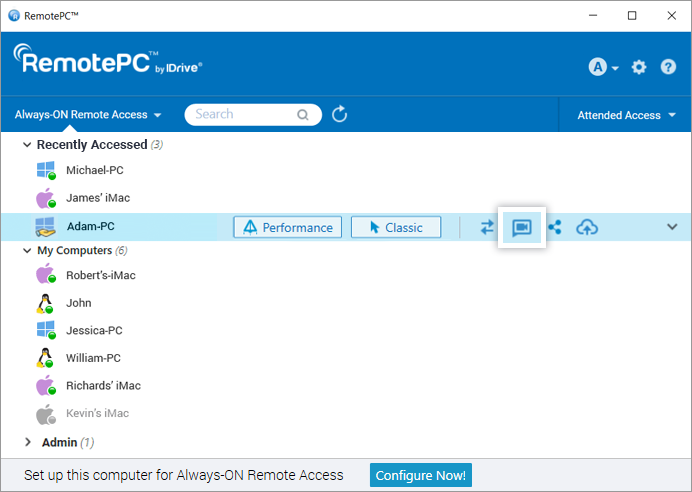
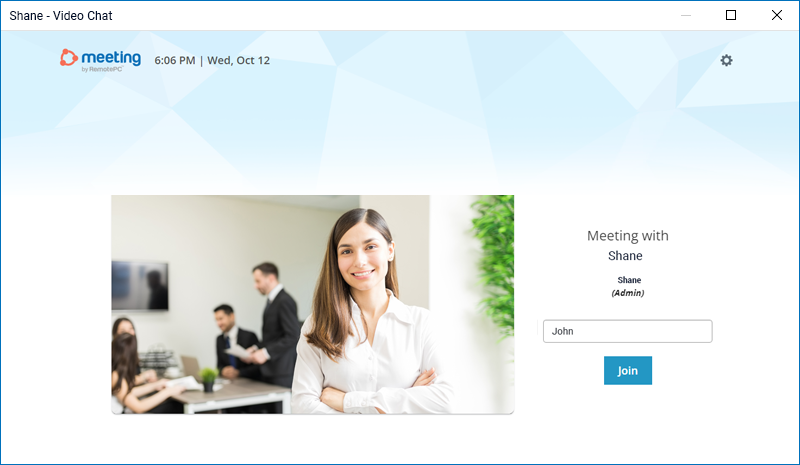
- The RemotePC Meeting screen will automatically launch. For the first time, you and the remote users will need to provide the permission to access the camera and microphone on your computers.
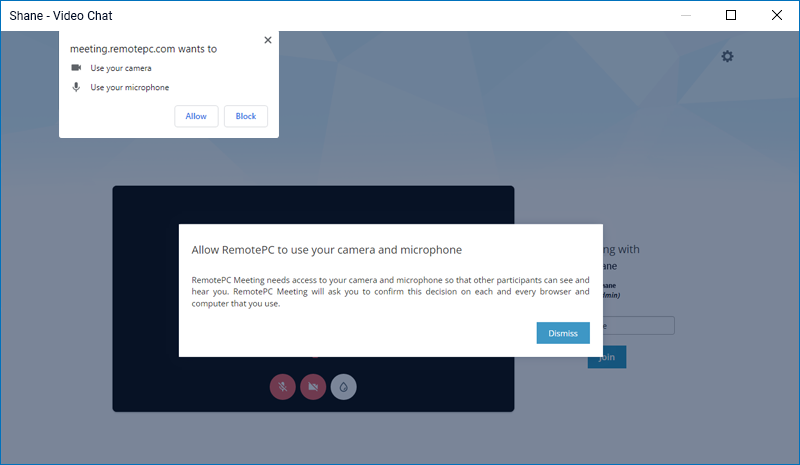
- Once the permission is granted, click 'Join' to begin the video call.
Yes, you can record remote sessions and save them at any desired location on your local computer. These files can be stored and viewed later. RemotePC saves the recorded file in MP4 format and it can be played via Windows Media Player or VLC.
For Mac:
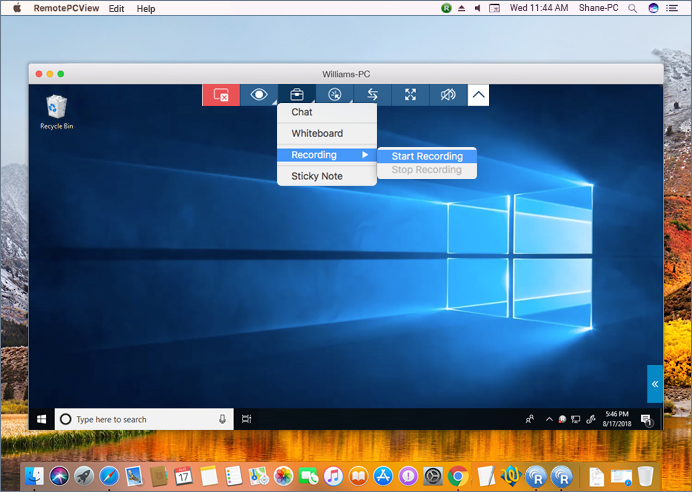
To record an active remote session,
- Launch the RemotePC application and log in.
- Connect to an online remote computer and establish connection.
- From the application menu, click
 -> 'Record Now'. The recording begins.
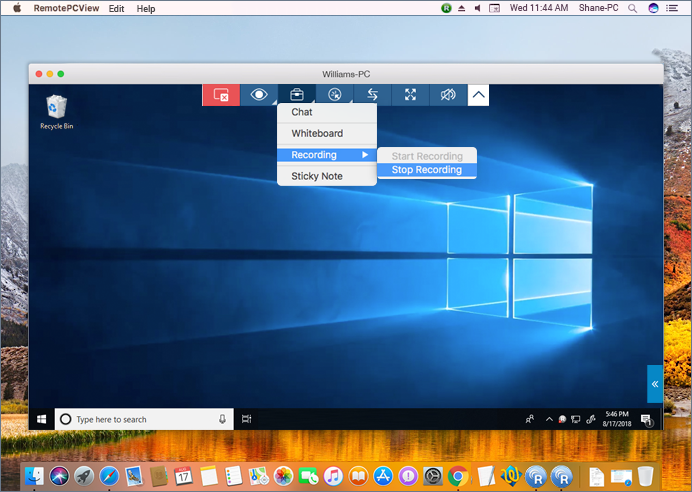
To stop the recording,
- From the application menu, click
 -> 'Stop Recording'.
 - The recording stops.
- The recording will be saved in your local machine.
For Windows:
To record an active remote session,
- Launch the RemotePC application and log in.
- Connect to an online remote computer and establish connection.
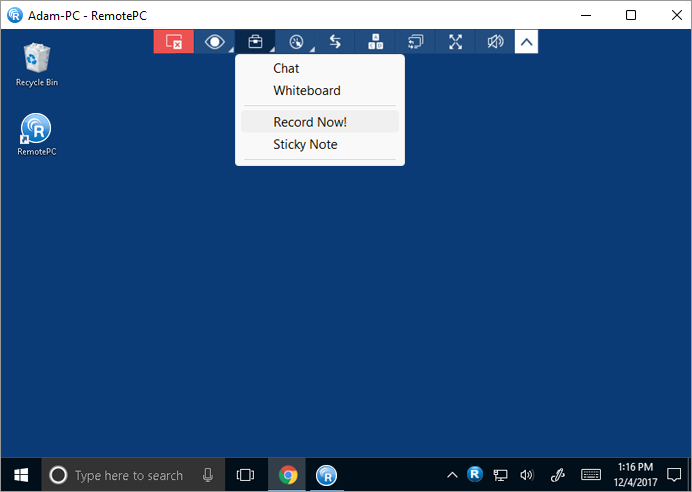
- From the application menu, click
 .
. - Click 'Record Now!'. The recording begins.
To stop the recording,
- From the application menu, click
 .
. - Click 'Stop Recording'. The recording stops.
- The recording will be saved in your local machine.
Yes, you can make notes on your remote computer screen with the help of the 'Sticky Note' feature.
To enable sticky note,
- Launch the RemotePC application and log in.
- Connect to an online remote computer, and establish connection.
- From the application menu, click
 .
. - Click 'Sticky Note'.
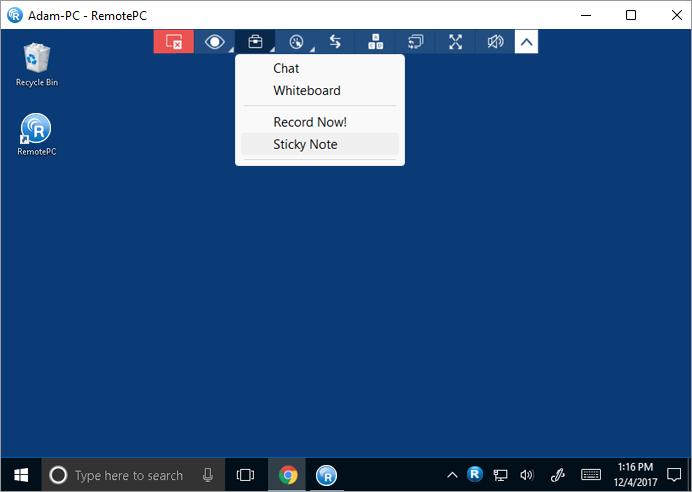
You can save and view the same after the remote session ends, in an offline mode.
For Windows, to save a note on your local computer, click  on the Sticky Note window, choose the destination folder, and click 'Save'.
Note: This feature is not available for Linux to Linux connections.
With Whiteboard, you can draw on the remote screen during a session to collaborate effectively.
To use Whiteboard,
- Launch the RemotePC application and log in.
- Connect to an online remote computer, and establish connection.
- From the application menu, click
 .
. - Click 'Whiteboard'. The Whiteboard panel will pop up on the screen.
Alternatively, you can access Whiteboard via the RemotePC Tray. Click 'Whiteboard' on the RemotePC Tray options and the Whiteboard panel will appear.
You can choose from the following options:
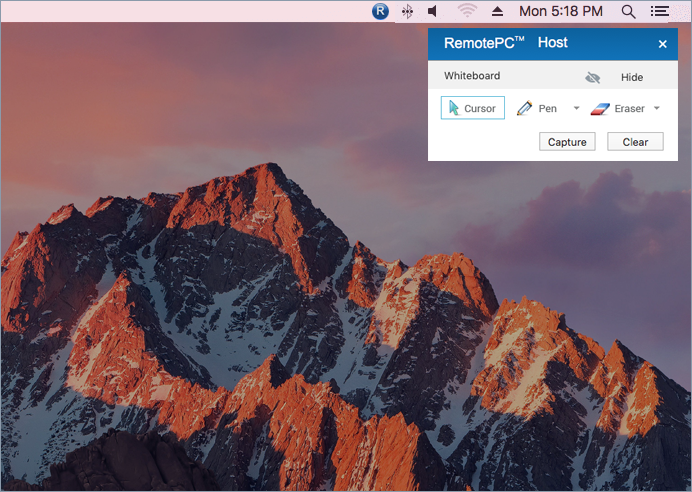
- Cursor: Selected by default, allows you to access the remote computer
- Pen: Select to draw on the remote screen. Choose a line width or color of your preference
- Eraser: Select to clear parts of the drawing on the screen. Choose a suitable width for the eraser
- Capture: Select to capture a screenshot and save it on the local computer
- Clear: Select to clear the entire drawing on the screen
Yes, you can play music and watch videos on the remote computer from your local computer.
For Windows:
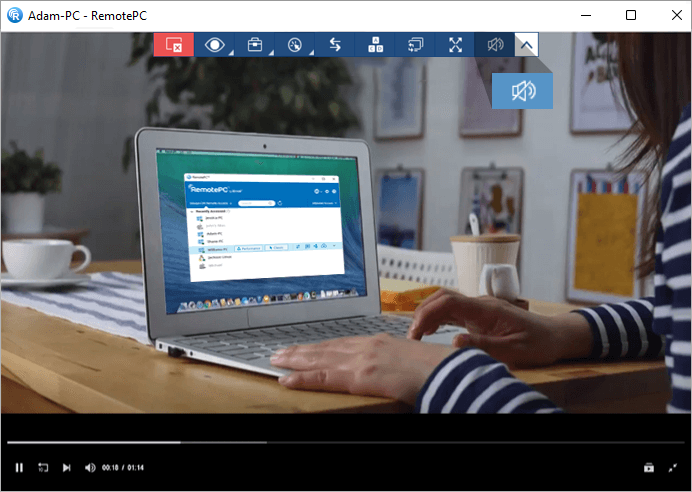
Click ![]() to play music or video. To mute audio, click
to play music or video. To mute audio, click ![]() .
.
For Mac:
Click 'Enable Sound' to play music or video. To mute audio, click 'Disable Sound'.
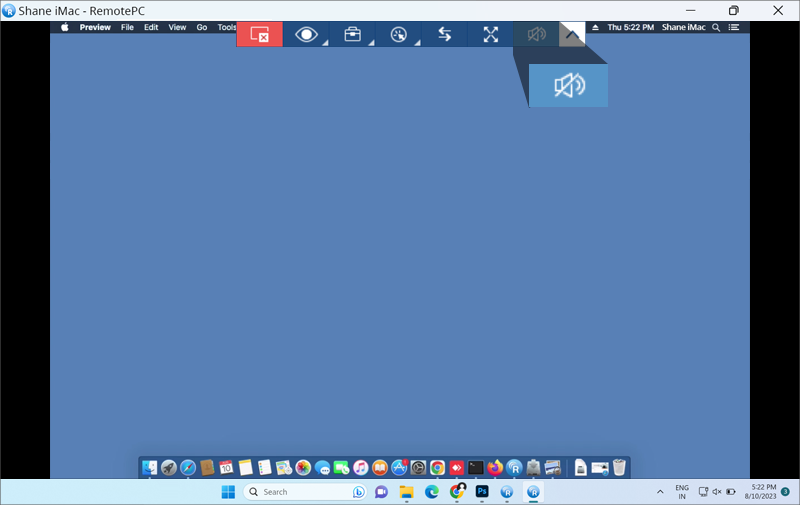
In Mac OS High Sierra and above, to play audio remotely you need to allow permission for RemotePC to install sound driver on your computer.
To enable during RemotePC installation,
- Click 'OK' when prompted to open System Preferences. You will be redirected to 'Security and Privacy' preferences.
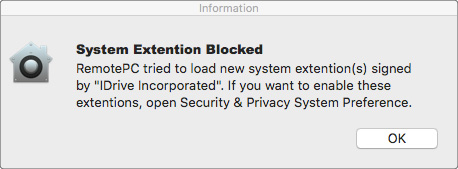
- Click 'Allow' under the 'General' pane to download the remote sound driver on your computer.
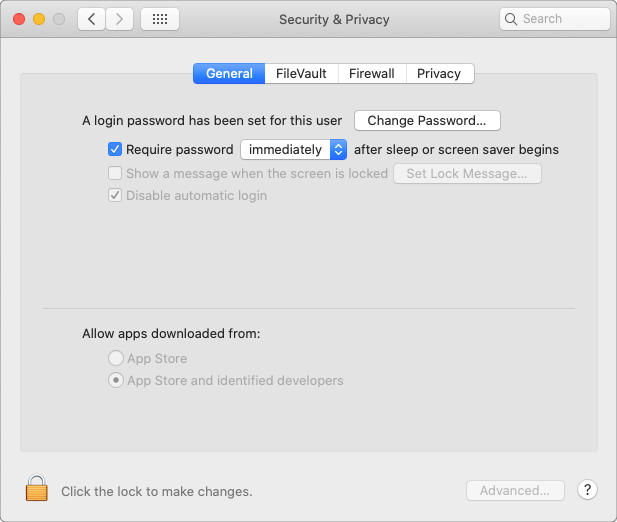
To enable later, navigate to 'Security and Privacy' in the Apple menu and click 'Allow' under the 'General' pane.
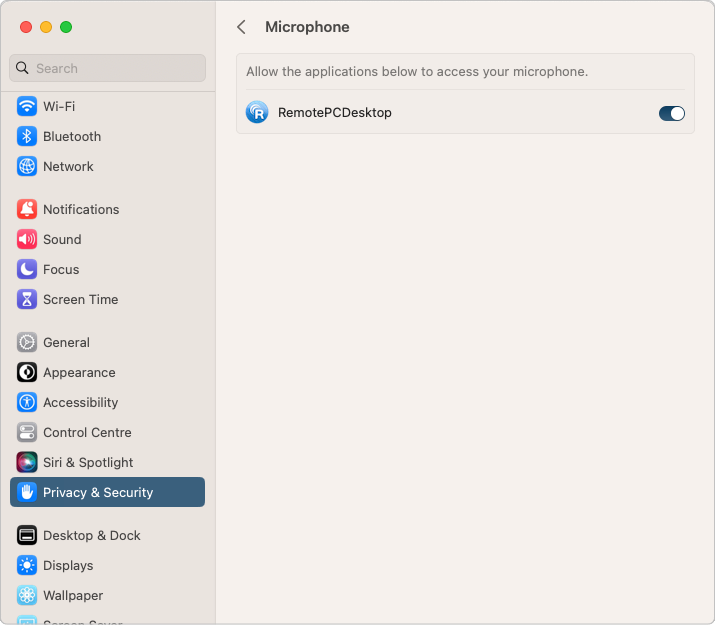
In case of Mac OS Mojave and above, RemotePC will need user permission to access the microphone and play audio remotely.
To allow microphone access,
- Click 'Allow Microphone Access' when prompted for microphone access. You will be redirected to 'Security and Privacy' preferences.
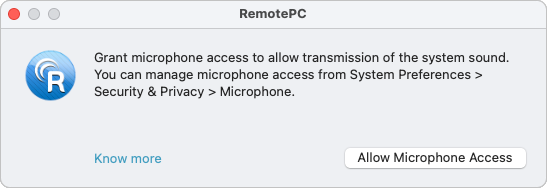
- Go to 'Microphone'.
- Click
 and provide system authentication to allow changes.
 - Select the checkbox next to 'RemotePCDesktop'.
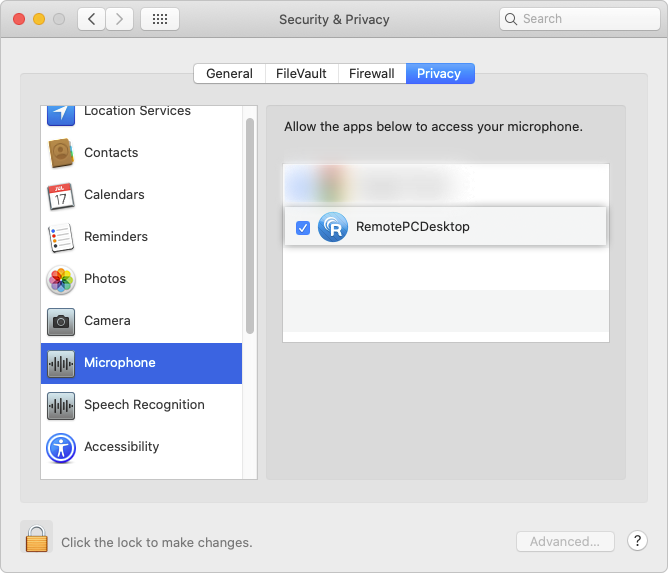
NOTE: For Ventura 13.0 users, Go to the 'Privacy & Security' tab, enable the toggle button beside 'RemotePCDesktop' in the Microphone settings.
For Linux:
- Go to 'Actions' from the application menu.
- Click 'Enable Sound' to play music or video.
The checkbox for the button will be marked when audio is enabled.
To mute audio, go to 'Actions' and click 'Enable Sound'. The check mark will disappear once the audio is disabled.
To troubleshoot sound-related issues on your remote Linux machine,
- Install 'pavucontrol' via apt/yum.
This will install the 'Pulse Audio Volume Control' application on your computer. - Open the newly installed application.
- Establish a remote connection between your local and remote Linux machine and click 'Enable Sound'
- Go to the 'Recording' tab in the 'Pulse Audio Volume Control' application.
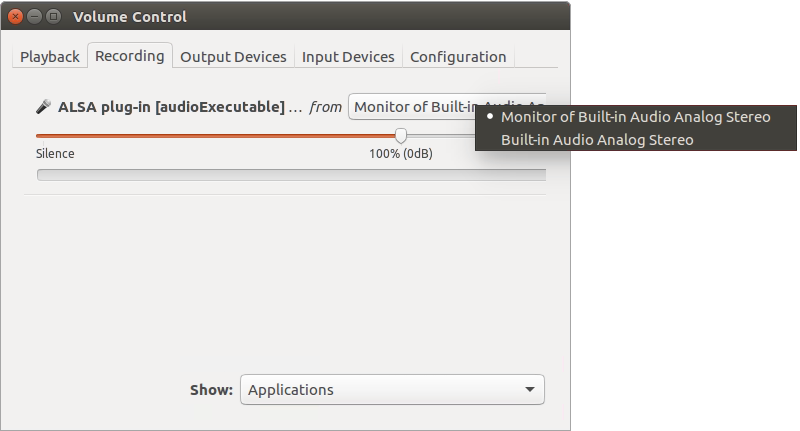
- Search for 'ALSA plug-in [audioExecutable]', and from the drop-down select 'Monitor of <audio device in your machine>'.
Note: Play sound functionality is not supported for Raspberry Pi devices.
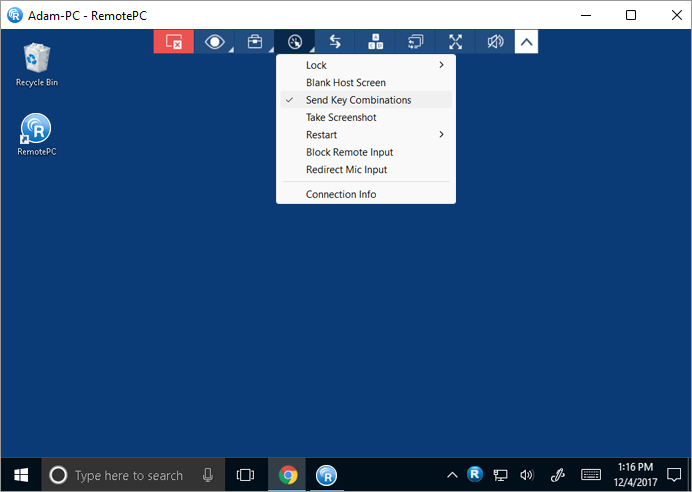
Yes, you can use keyboard shortcuts (such as Ctrl + C) on your remote computer during a remote session, by enabling the 'Send Key Combinations' feature.
To enable,
- Launch the RemotePC application and log in.
- Connect to an online remote computer, and establish connection.
- From the application menu, click
 .
. - Click 'Send Key Combinations' / 'Send Key Combination'.
Yes, you can lock the partner computer screen during a remote session.
To lock,
- Launch the RemotePC application and log in.
- Connect to an online remote computer, and establish connection.
- From the application menu, click
 .
. - Click 'Lock' -> 'Lock now', to instantly lock the partner computer screen.
- Click Lock -> 'Lock on session end', to lock the partner computer screen as soon as the remote session ends.
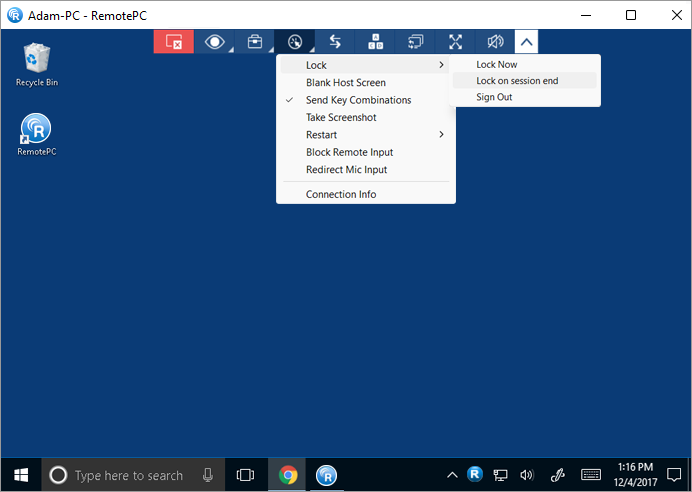
- Click 'Lock' > 'Sign out'/ 'Logout' to log off the current user profile.
You can also lock the remote computer using the Ctrl+Alt+Del command. When connected to a remote Windows system, the Ctrl+Alt+Del keyboard command will open the screen with Lock, Task Manager, Sign out, and related options. When connected to a remote Mac machine, the Ctrl+Alt+Del keyboard command will open the 'Force Quit Applications' window.
To send the Ctrl+Alt+Del command,
- Launch the RemotePC application and log in.
- Connect to an online remote computer and establish connection.
- From the application menu, click
 .
.
Note: Locking remote computer screen is not supported for Raspberry Pi devices.
In order to avoid others from viewing your remote computer screen during an ongoing session, you can black out the screen of your remote computer. The 'Blank Host Screen' feature is helpful in such scenarios where you do not have physical access to the machine to turn off the display of the remote computer.
To blank the host screen,
- Launch the RemotePC application and log in.
- Connect to an online remote computer, and establish connection.
- From the application menu, click
 .
. - Click 'Blank Host Screen'.
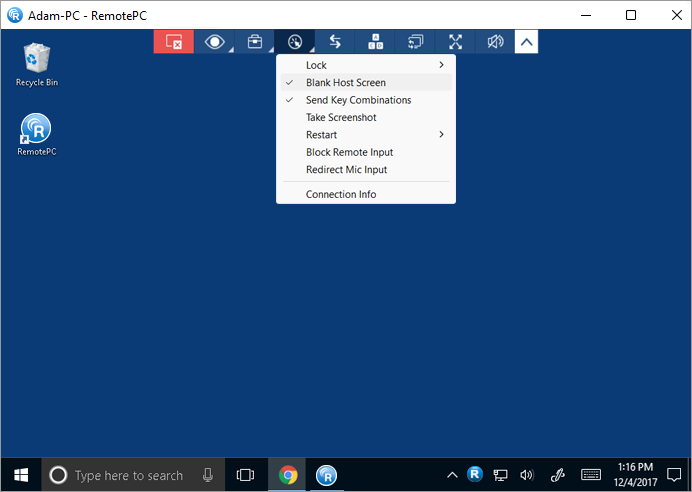
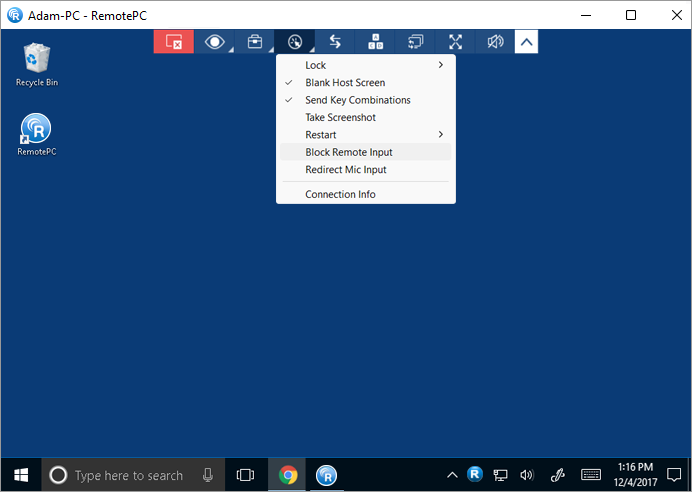
Yes. While accessing a Mac or a Windows machine, you can prevent users at the remote end from using mouse and keyboard during a session with the 'Block Remote Input' option.
To block remote input,
- Launch the RemotePC application and log in.
- Connect to an online remote computer, and establish connection.
- From the application menu, click
 .
.
- Click 'Block Remote Input'.
Note: Press Ctrl+Alt+Del on the remote computer to undo the action.
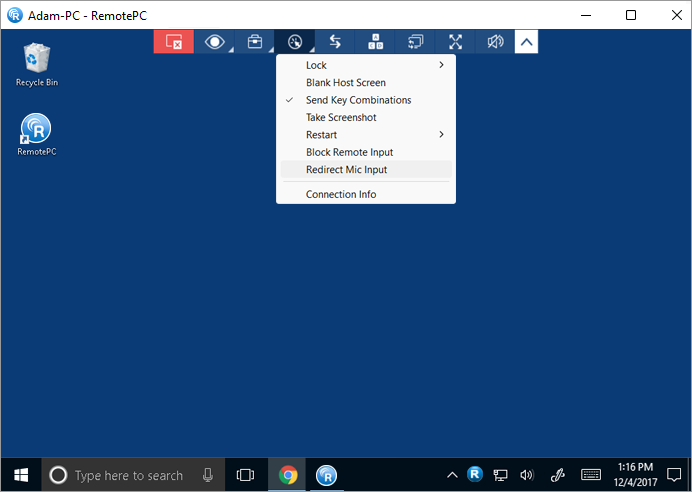
Yes, the microphone passthrough feature allows you to redirect your local microphone input to the remote computer/apps/ services as though you were sitting at the remote end. This feature allows you to join calls and use voice recording/dictation features over the remote session. This is currently available only for Classic Viewer.
For Windows:
To redirect your microphone input during a remote session,
- Launch the RemotePC application and log in.
- Connect to an online remote computer, and establish connection.
- Click
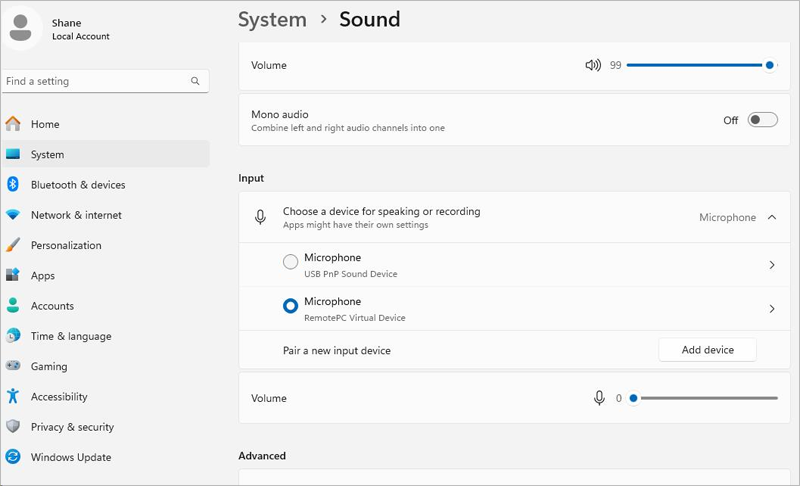
 and select 'Redirect Mic Input'. This will install the 'RemotePC Virtual Device' on the remote computer and it will be selected as the microphone input.
Note:
- The local computer must have Windows 8 or above and the remote computer requires Windows 10 or above.
- If an external microphone is connected to the remote computer during in-session, set 'RemotePC Virtual Device' as a default option from the sound settings in your remote computer.
For Mac:
Before redirecting the remote computer's microphone, below settings should be enabled:
- Enable 'Remote Sound' to allow audio controls
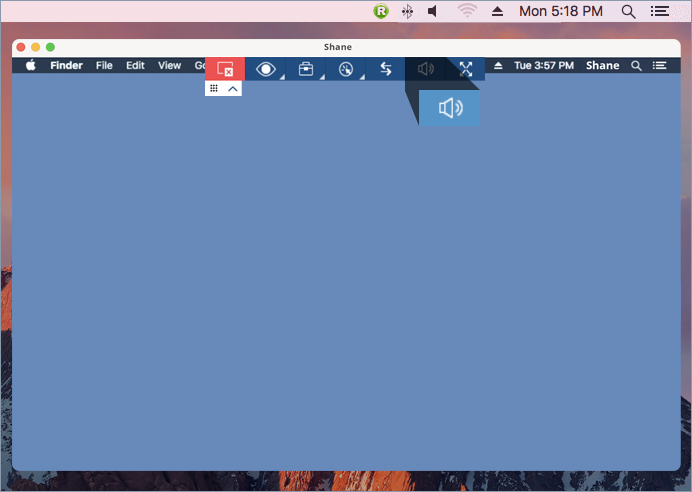
- Set up your machine's sound settings using one of the below options:
- Select your computer's default built-in sound input and output settings
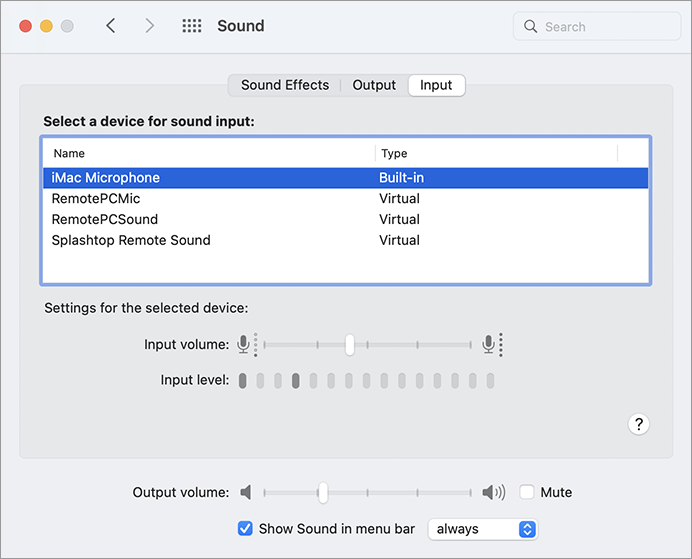
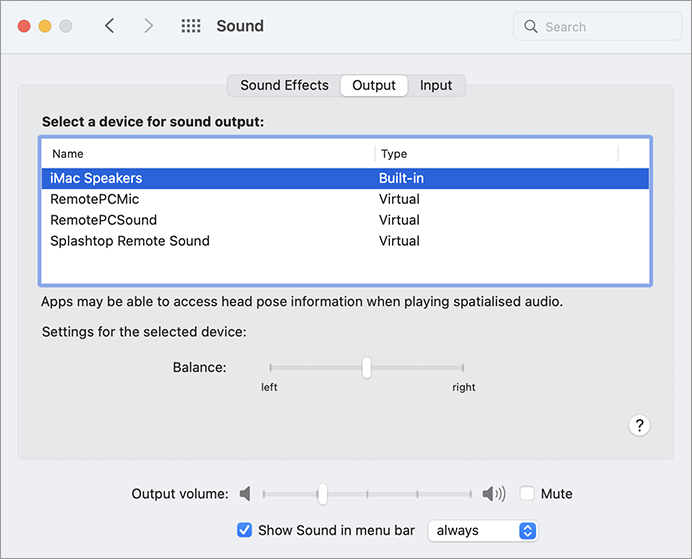
- Select the external sound device if it is connected to your machine
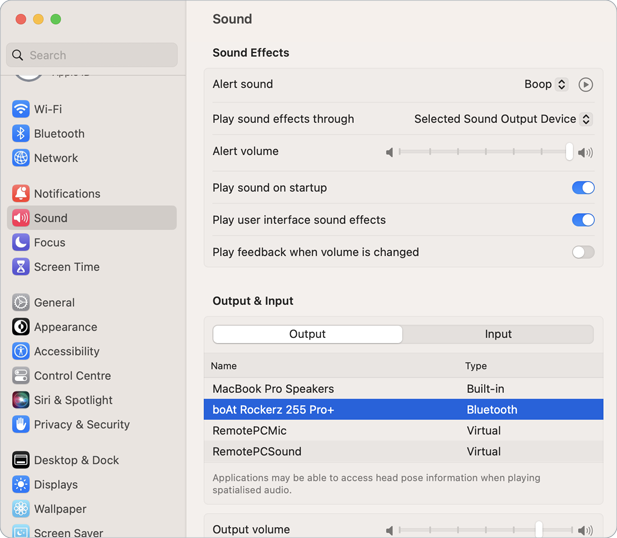
- Select your computer's default built-in sound input and output settings
To redirect your microphone input during a remote session,
- Launch the RemotePC application and log in.
- Connect to an online remote computer, and establish connection.
- Click
 and select 'Redirect Mic Input'. The 'RemotePCMic' option will be selected as the virtual microphone input.
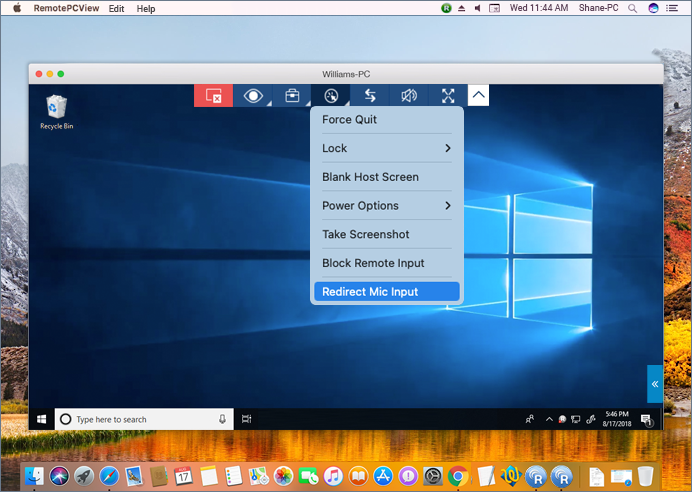
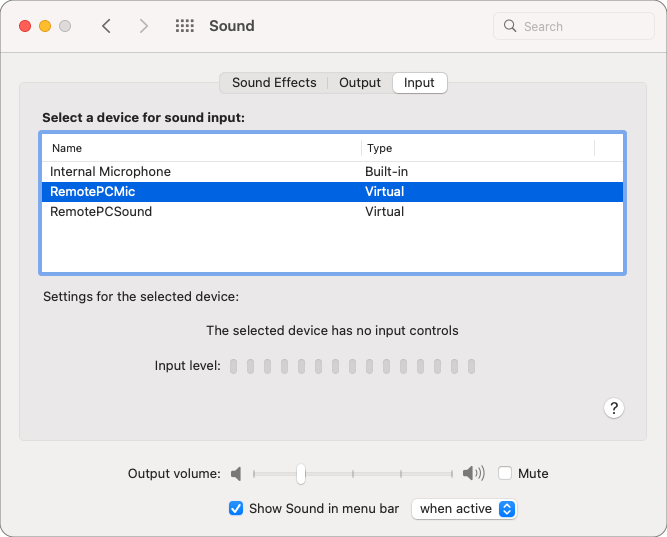 Note: The Redirect Mic Input option is supported by MACOS*10.11 (El Capitan) and above.
To mute or unmute the microphone passthrough during the remote session, click the 'Redirect Mic Input' option.
A group is a collection of computers.
To create a computer group,
- Launch the RemotePC application and log in.
- Click
 displayed on the menu bar.
 - Enter a name in the 'Create Group' popup.
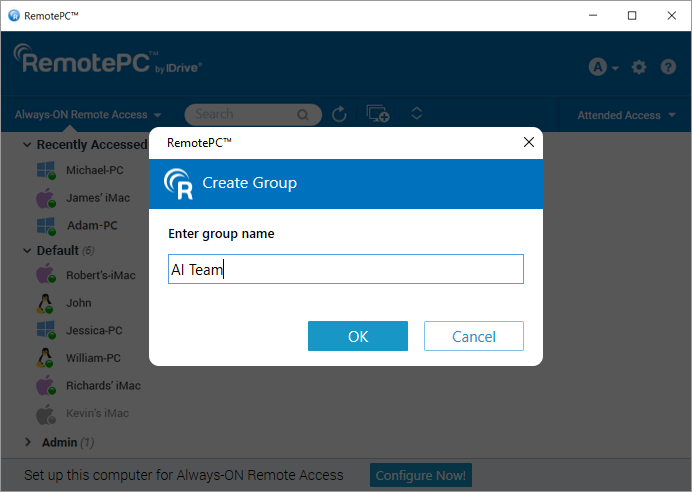
- Click 'OK'.
To rename a group name,
- Launch the RemotePC application and log in.
- Right-click a group name. From the options that appear, click 'Rename Group'.
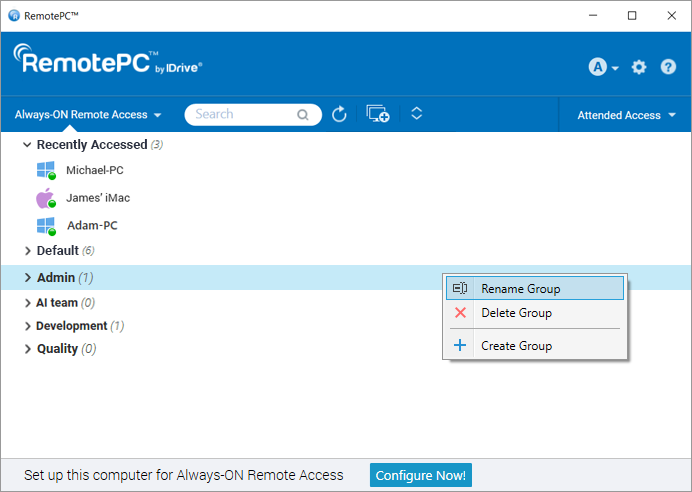
- Enter a new name in the 'Rename Group' field.
- Click 'OK'.
To delete a group,
- Launch the RemotePC application and log in.
- Right-click a group name. From the options that appear, click 'Delete Group'.
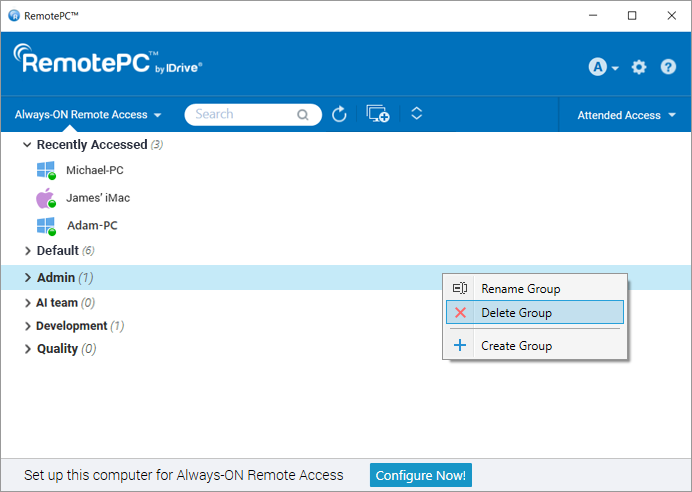
- A popup with an alert message will appear. Click 'OK' to delete the group.
On deletion of the group, all the computers will be moved to the Default group.
Yes, you can move computers between groups.
To move,
- Launch the RemotePC application and log in.
- Click a group name. The list of computers in the group will appear.
- Click a computer name, and in the options that appear, click 'Move'.
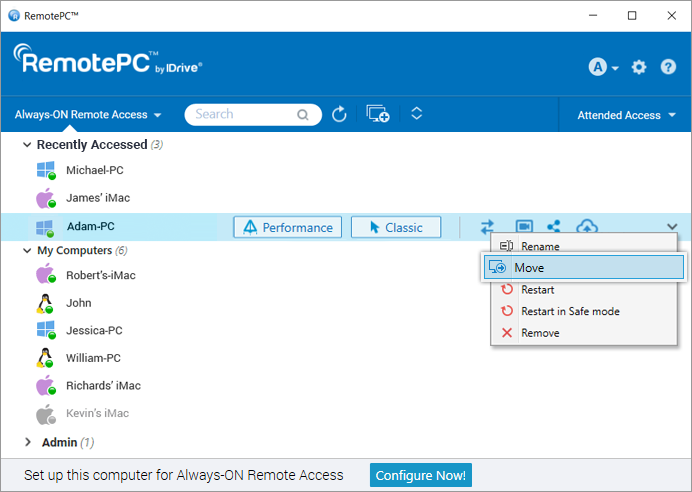
- In the 'Move Computer' screen, select the required group where you want to move the computer.
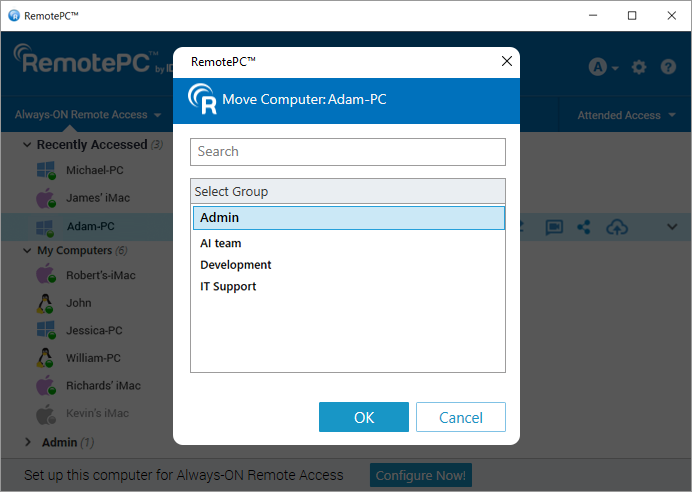
- Click 'OK'.
Alternatively, you can move a computer by dragging and dropping it to another group.
Yes, you can remove or rename a computer from within a group.
To remove a computer,
- Launch the RemotePC application and log in.
- Click a group name. The list of computers in the group will appear.
- Click a computer name, and in the options that appear, click 'Remove'.
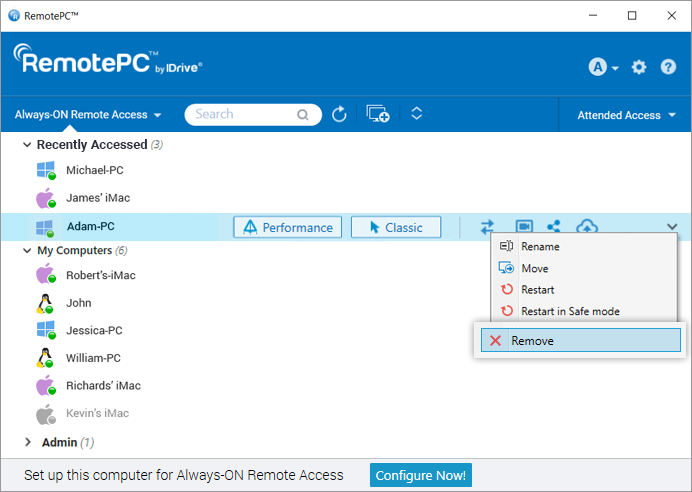
- Click 'Yes' in the popup that appears, to remove the computer from the group.
To rename a computer,
- Click a group name. The list of computers in the group will appear.
- Click a computer name, and in the options that appear, click 'Rename'.
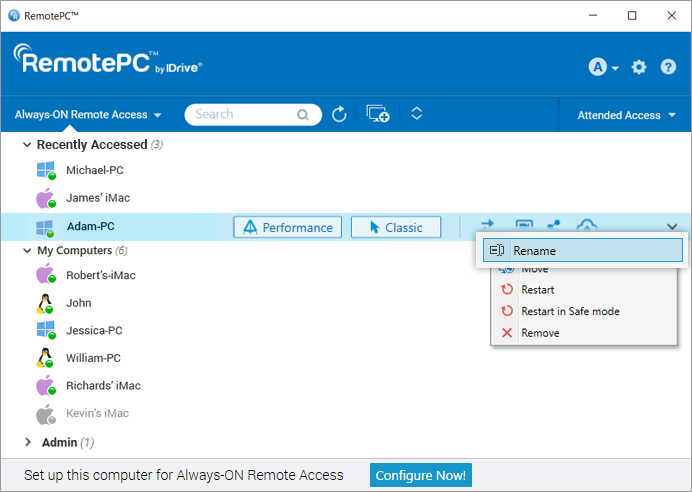
- Enter a new name in the 'Rename Computer' field.
- Click 'OK'.
Yes, with RemotePC you can print documents and images that are on your remote computers from wherever you are.
To print,
- Launch the RemotePC application and log in.
- Connect to an online remote computer, and establish connection.
- Select the file on the remote computer that is to be printed.
- Open the document and use Print command (or Ctrl+P) to print the selected document.
- Select 'RemotePC Printer' in the window and click 'Print'.
- Select a local printer when prompted, and click 'Continue'.
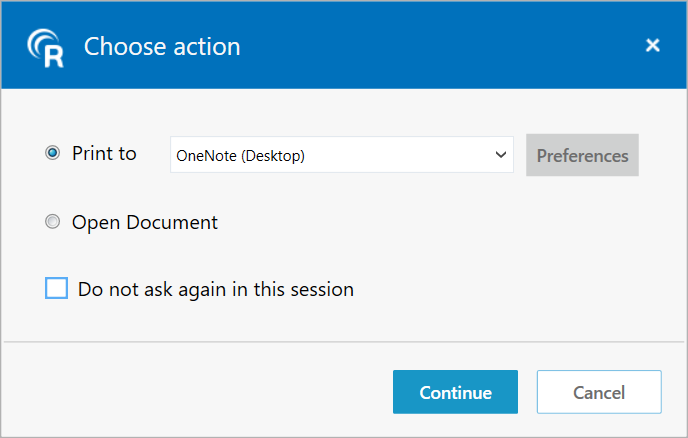
If a local printer is not configured, click 'Open Document' to view or save the document on the local computer.
Note:
- If more than one local printer is configured, the printing operation will be performed using the default printer.
- 'RemotePC Printer' will be displayed only during active remote sessions.
- RemotePC Printer is not supported for/in CLI (headless) Linux machines.
Yes, you can use the RemotePC application via VPN. It allows you to create a secure connection between the local and remote computer and the connected computers act as if they are in the same network. Thus, users experience no lag during a remote session, and can work as if on their own computer.
To use RemotePC via VPN you need,
- An active Internet connection in both the local and remote computer
- VPN configured in both local and remote computer
- VPN enabled in the local computer
With the above requirements, RemotePC automatically detects the VPN and establishes a connection between the local and remote computer.
Yes, you can end an ongoing session when your computer is being remotely accessed. When a remote computer connects to your computer, a message appears on the bottom-right corner of the screen. You can end the session and restrict access to the remote computer by clicking 'End Session'.
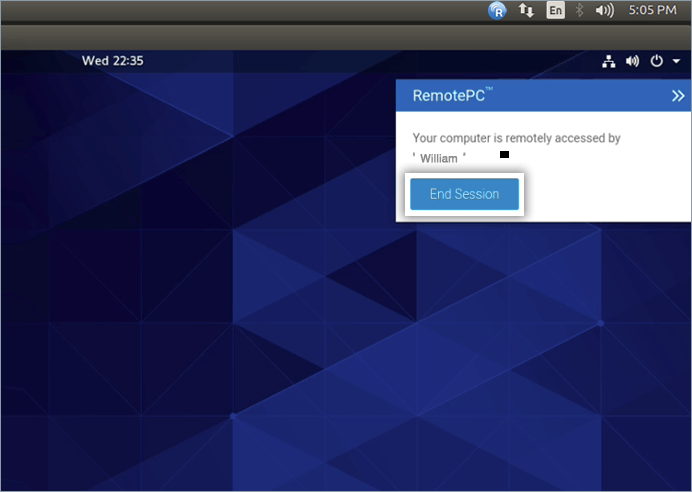
To rename a configured computer,
- Launch the RemotePC application and log in.
- Right click on the computer name and click 'Rename'.
- Type a new name in the text field and click 'Rename'.
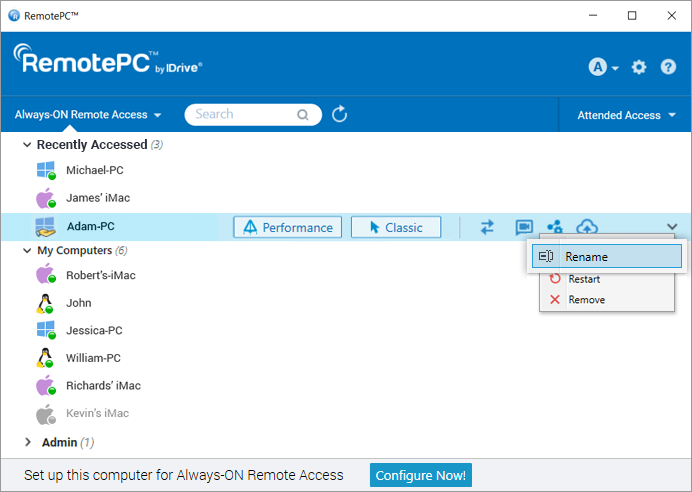
To remove a configured computer,
- Launch the RemotePC application and log in.
- Right click on the computer name and click 'Remove'.
- Click 'Yes' in the confirmation window.
You can only remove the computers that are online or offline.
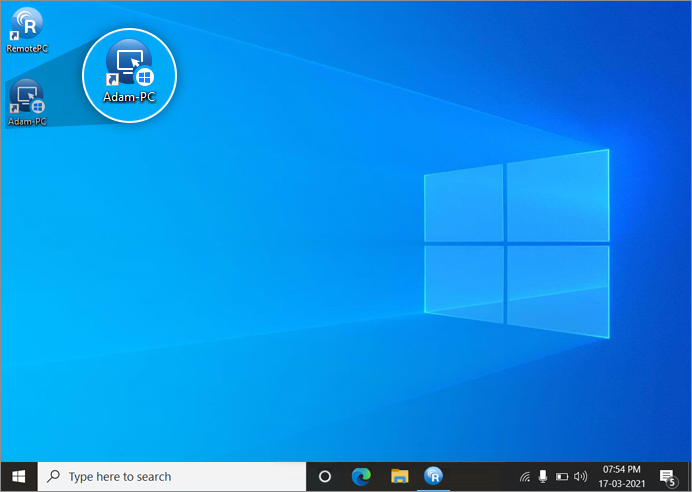
Create desktop shortcuts to instantly connect or transfer files to your remote desktop.
To create a shortcut,
- Launch the RemotePC application and log in.
- Right click on the computer from the list, for which you want to create a shortcut. Select 'Manage Desktop Shortcuts'.
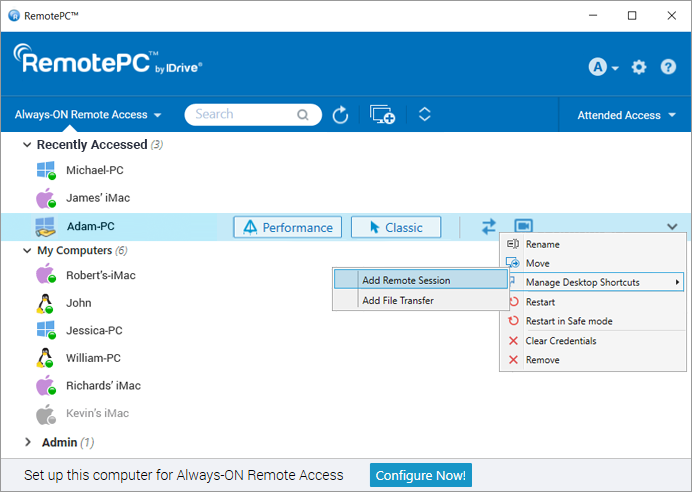
- Choose the type of shortcut you want for the computer.
- The desktop shortcut will be created for that remote computer.
To delete a shortcut,
- Launch the RemotePC application and log in.

- Right click on the computer from the list, for which you want to delete a shortcut. Select 'Manage Desktop Shortcuts'.
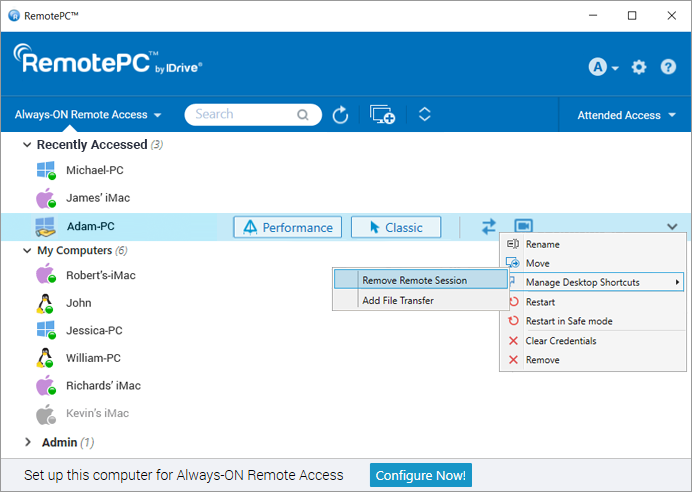
- Choose the type of shortcut you want to delete for the computer.
- The shortcut will be deleted for the remote computer.
Alternatively, users can delete the shortcut with native Windows delete option.
Yes, you can drag and drop multiple files/folders between your local and remote computer during an ongoing session. Select the desired files/folders from the remote computer and drop them on to a specific location on your local computer, or vice versa. You can securely transfer files across multiple platforms i.e., from Windows to Mac or vice versa.
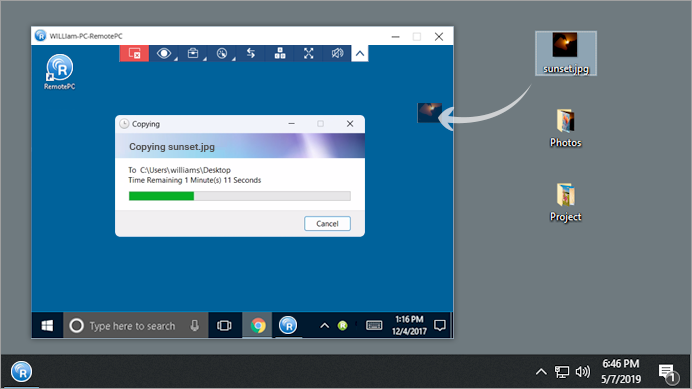
Note: You can also copy paste files, folders, and text messages between your local and remote machines.
Yes, using one local computer, when you connect to multiple remote computers, you can copy files, folders, and text messages from one remote computer to another remote computer. Copy the files/folders/text messages from one remote machine and go to another remote computer and paste them in the desired location.
Note: Both local and remote machines should be updated to the latest RemotePC version.
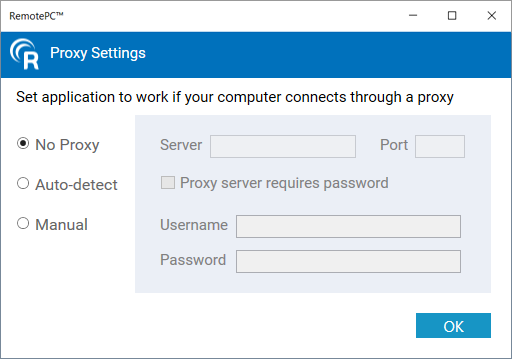
To configure proxy settings, right-click the RemotePC tray icon and select 'Proxy Settings'.
The following are the available options:
- No Proxy: This is a default setting.
- Auto-detect: Select to get the proxy settings automatically.
- Manual: Select and configure the proxy server name, port and authentication details.
To uninstall RemotePC,
For Windows:
- Click Start menu.
- Locate the RemotePC folder from the list of applications.
- Right-click on the RemotePC application and click 'Uninstall'. You will be redirected to 'Control Panel'.
- Right-click on 'RemotePC' and select 'Uninstall'.
For Mac:
- Launch the RemotePC application and log in.
- Connect to an online remote computer, and establish connection.
- Click on the RemotePC icon for the RemotePC tray menu option.
- Click 'Preferences' and go to the 'Advanced' tab.
- Under the 'Uninstall' option, choose the 'Also delete configuration files' option.
- Click 'Uninstall' > 'Yes' on the confirmation window.
The RemotePC application with all the configuration files will be uninstalled.
For Linux:
- Go to the package manager, e.g. Open with Ubuntu Software Center.
- Locate the RemotePC folder from the list of applications.
- Click 'Remove' which appears on mouse hover.
A message will appear prompting you to enter the password of your computer. - Provide the password to complete the uninstallation process.
You can also run the following commands to remove and purge the packages:
| Action | Debian | RPM |
| Uninstall | apt purge remotepc/remotepcviewer/remotepc-host | yum remove remotepc/remotepcviewer/remotepc-host |
Wake-on-LAN in RemotePC lets you wake up your offline remote computers to establish a connection from anywhere. Enable WOL in the RemotePC application and turn on an offline remote computer using any of the following options:
- Through Local Network
- Through a Public IP
Learn more about hardware requirements and settings configuration needed to successfully enable WOL in Windows computers for WOL.
Note: This functionality is currently not supported for Mac.
Before performing the steps to enable Wake-on-LAN, ensure that the hardware requirements and settings configuration needed to successfully enable WOL are fulfilled.
To enable WOL through local network,
- Launch the RemotePC application and log in.
- Click 'Configure Now!' and configure your computer for remote access.
- Click
 displayed on the top-right corner.
 - Click 'Configure'.
- Select 'Wake-on-LAN through Local Network' from the 'Select option to wake up this computer via Wake-on-LAN' drop-down list.
- Click
 , select the computers you want to add as mediator computers and click 'Add'.
 Note: Ensure that the selected mediator computer is in the same network (LAN) as the local computer.
- Click 'OK'.
To enable WOL through a Public IP,
- Launch the RemotePC application and log in.
- Click 'Configure Now!' and configure your computer for remote access.
- Click
 displayed on the top-right corner.
 - Click 'Configure'.
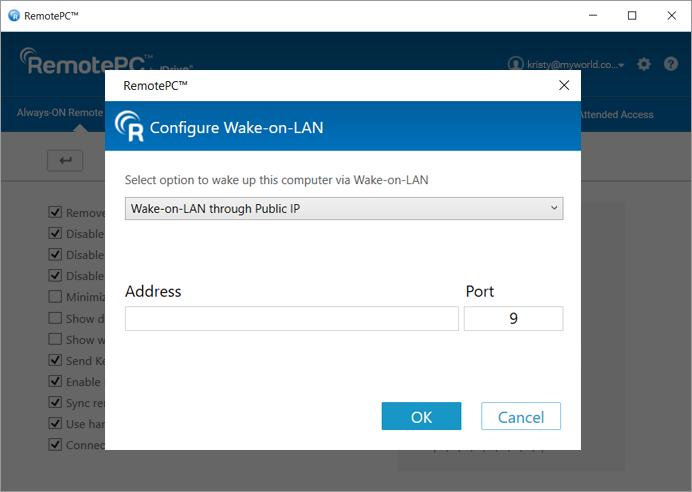
- Select 'Wake-on-LAN through Public IP' from the 'Select option to wake up this computer via Wake-on-LAN' drop-down list.
- Enter a Public IP and port number in 'Address' and 'Port' fields respectively.
- Click 'OK'.
Before you enable WOL through a public IP, make sure the following requirements are met:
- Network Firewall (if any) should be configured to allow any UDP packet that is received for this Public IP and Port number.
- Router with this Public IP should be configured to forward any UDP packet that is received for this Port number to the system on which you wish to enable WOL.
Note: This functionality is currently not supported for Mac.
To wake up an offline remote computer after enabling WOL,
- Launch the RemotePC application and log in.
- Click
 displayed next to the offline computer name to wake up that computer.
- 'Drag and Drop' feature is not available for connections via Linux machines.
- Some options like 'Session Recording' and 'Send key combinations' will not be available while using RemotePC™ Viewer Lite.