RemotePC Backup enables you to backup your computers to the cloud. The endpoint backup feature is integrated with the existing RemotePC infrastructure. Users can enable backup for the required computers and keep the data protected against ransomware and data loss.
To enable backup for your account,
- Sign in to your RemotePC account.
- Go to the 'Backup' tab.
- Click 'Enable Online Backup'.
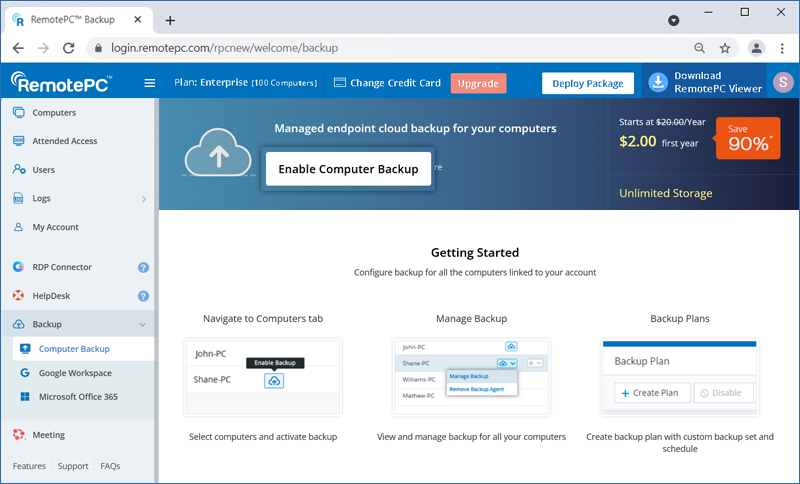
- Select a backup plan.
- Click 'Proceed' in the confirmation popup.

- Click 'Continue' to confirm account upgrade.
Once backup is enabled for your account, you will receive dashboard and email notification.
To enable backup,
- Sign in to your RemotePC account.
- Click 'Enable Backup' next to the computer you want to backup.

- Click 'Activate Backup'. The backup agent will be downloaded and installed on your computer.

- Once your computer is configured for backup, click
 .
.

- Click 'Manage Backup'. You will be redirected to the backup console.
The computer will be backed up as per the default Backup Plan. You can also modify the default plan or create new.
Remote backup uses industry standard 256-bit AES encryption on transfer and storage to ensure that all your data is secure.
To perform backup,
- Sign in to your RemotePC account.
- Click
 next to the computer you want to backup.
 - Click 'Manage Backup'. You will be redirected to the backup console.

- Hover on the required computer and click
 .
.
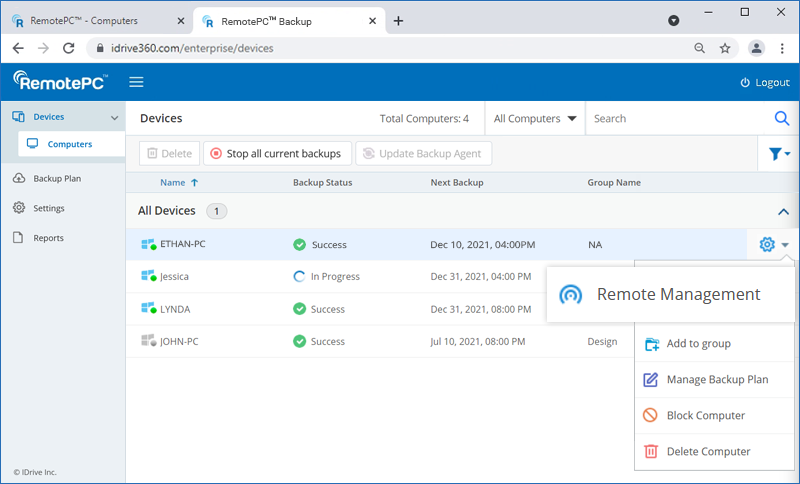
- Click 'Change', to add or remove files/folders from the default backup plan.

- Click 'Backup Now'.

The backup progress will appear on screen.
A backup plan is a set of rules that determine the nature of data protection on a particular computer.
When you enable remote backup for your computer, a backup plan is created by default with predefined folders and applied on the computer. You can view the backup plan, modify and disable the backup rules, and rename the plan name from the 'Backup Plan' tab. However, you cannot delete the default backup plan.
You can also create a new backup plan with certain backup configurations and push it to the selected computers at a time.
To create a backup plan,
- Click
 against a configured computer and select 'Manage Backup'.
 - In the backup console, go to the 'Backup Plan' tab and click 'Create Plan'.

- Hover over the default plan name and the 'Rename Backup Plan' popup appears. Enter the desired name and click 'Save'.

- Modify the menu options:
- Backup start time : Set the time at which your scheduled backup should start.
- Daily schedule : Select this option to run your backup jobs daily.
- Weekday(s) : Select the days of the week when you wish to run your backup jobs.
- Start backup immediately : Select this option to run a backup job immediately.
- Cut off time : Set the time at which your scheduled backup should stop.
- Email notification : Select this option to receive email notifications on the status of the scheduled backup job. Enter the email address on which you want to receive the notifications.
- Notify always - Select this option to get notifications always.
- Notify on failure - Select this option to get the notifications only when there are failures.
- Start the missed scheduled backup when the computer is turned on : Select this option to resume a missed scheduled backup job due to the computer being turned off.
- Click 'Create'.
Devices/Groups : Click 'Add'. Select devices or groups to be added from the 'All Devices' or 'Groups' tab respectively. Click 'Done'.
What to backup? : Click 'Specify'. From the 'Using policy rules' drop-down list choose the items for backup. Click 'Customize' to add items to the backup set. Click 'Done'.

Where to backup? : Choose 'Cloud Storage' or 'Local Storage' as backup destination.
Schedule : You can set your backup schedule here and click 'Done'.
Exclude Files / Folders : Click 'Add'. Exclude hidden or system files from the backup set. Add full or partial file/folder names to exclude them from being backed up. Click 'Done'.
Once the backup plan is created, it will be automatically applied to the selected devices / groups and the backup will start immediately or at the scheduled time, according to the selected option.
Yes, you can define a backup rule for selecting files / folders in all your backup plans.
There are two ways for selecting files / folders, either by using policy rules or by customized selection method.
To select files / folders using policy rules,
- Click
 against a configured computer and select 'Manage Backup'.
 - In the backup console, go to the 'Backup Plan' tab and click 'Create Plan'.
- Under 'What to backup? option, click 'Specify' and select 'Using policy rules'.

- Click 'Add Rule' and select any of the pre-defined rules.

- Click 'Done'.
To modify an existing backup plan,
- Click
 against a configured computer and select 'Manage Backup'.
 - In the backup console, go to the 'Backup Plan' tab and navigate to the backup plan you wish to modify. Hover on the backup plan name and click
 .
.
- In the 'Update Plan' screen that appears, modify your backup plan details and click 'Update'.

To optimize bandwidth certain file types and system folders are excluded from backup by default. You can choose to include these items for backup. You can also exclude other files/folders from being backed up, based on full path names or partial names.
To modify files/folders excluded from backup,
- Click
 against a configured computer and select 'Manage Backup'.
 - In the backup console, go to the 'Backup Plan' tab and click 'Create Plan'.
- In the 'Create Plan' screen that appears, click 'Add' against the 'Exclude Files / Folders' field.
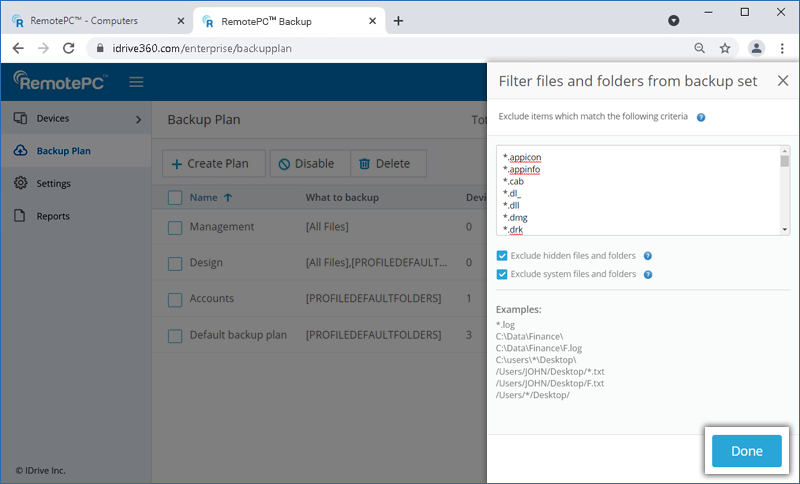
- Add or remove the files and folders you wish to exclude from backup, and click 'Done'.
To modify files/folders excluded from backup using the remote management console,
- In the 'Devices' tab, hover on the computer you wish to backup, and click
 .
. - In the 'Backup' tab, click 'View excluded files'.
- Add or remove the files and folders you wish to exclude from backup in the 'Exclude items which match the following criteria' field.
- System files/folders and hidden files/folders are excluded by default. You can use the checkboxes to include these items for backup.
- Click 'Save Changes'.
Default Exclusion List
- Application & System Files
These are executable files, system files, and installer-related files.- Executable & Installer Files: .exe, .msi, .cab, .dl_, .dll
- System Files: .sys
- Virtual Machine & Disk Image Files
These are related to virtual machines, disk images, and snapshots.- Virtual Machine Files: .vdi, .vhd, .vhdx, .vmc, .vmdk, .vmem, .vmsd, .vmsn, .vmss, .vmx, .vmxf, .vsv, .vud, .nvram
- Disk Image & Backup Files: .iso, .sparseimage, .dmg, .hdd, .hds, .fdd, .wim
- Parallels VM Files: .pva, .pvi, .pvm, .pvs
- Log & Temporary Files
These store logs, temporary data, and configuration.- Log Files: .log
- Temporary & Cache Files: .qtch, .menudata, .wab~
- Email & Data Storage Files
These are used for email storage and application data.- Email Files: .ost
- Miscellaneous Files
These files are related to metadata, application configuration, and debugging.- App & Config Files: .appicon, .appinfo
- Memory Dump & Debug Files: .mem, .drk
- iOS & Thumbnail Files: .ithmb
- Object Files
- Compiled Object Files: .o (Generated by compilers as intermediate object code before linking into an executable)
- System files and folders:
For Windows:
- C:\Windows\
- C:\Program Files (x86)\
- C:\Program Files\
- C:\pagefile.sys
- C:\hiberfil.sys
- Files and folders with System attribute
- /Library
- /Applications
- /Users/all users/Library/Cookies
- /Users/all users/Library/Logs
- /Users/all users/Library/Caches
- /Users/all users/Library/Saved Application State
- /Users/all users/Library/Containers/com.apple.mail/Data/DataVaults
- /Users/all users/Library/VoiceTrigger/SAT
- /dev/
- /run/
- /lost+found/
- /cdrom/
- /swapfile
- /proc/
- /sys/
- C:\pagefile.sys
- C:\hiberfil.sys
For a Mac computer, the following OS directories are excluded from backup by default:
- /bin
- /cores
- /dev
- /etc
- /home
- /net
- /private
- /sbin
- /System
- /tmp
- /usr
- /var
- /Volumes
- /Network
- /.Temporary Items
- /.Trashes
To propagate a backup plan,
- Click
 against a configured computer and select 'Manage Backup'.
 - In the backup console, go to the 'Backup Plan' tab.
- Hover on the backup plan name you wish to propagate, and click
 .
.

- Select the Devices or Groups to which you want to propagate the backup plan from the 'All Devices' or 'Groups' tab, respectively.
- Click 'Propagate'.

Yes, you can disable a backup plan.
To disable,
- Click
 against a configured computer and select 'Manage Backup'.
 - In the backup console, go to the 'Backup Plan' tab and select the backup plan you wish to disable.
- Click the 'Disable' button.
- In the popup that appears, click 'Disable'.

To enable the same, select the backup plan and click the 'Enable' button. Click 'Yes' in the popup that appears
To delete a backup plan,
- Click
 against a configured computer and select 'Manage Backup'.
 - In the backup console, go to the 'Backup Plan' tab and select the backup plan you wish to delete.
- Click the 'Delete' button.

- In the popup that appears, select the confirmation checkbox and click 'Delete'.

On deleting a backup plan, all the backups with the configured settings will be discontinued for the associated devices.
Yes, you can stop ongoing backups of all devices, in one click.
To stop ongoing backups,
- Click
 against a configured computer and select 'Manage Backup'.
 - In the backup console, go to the 'Devices' tab.

- Select the devices for which you wish to stop the ongoing backup operations.
- Click 'Stop all current backups'.

- In the confirmation pop-up, click 'Ok'.

Note: All ongoing backups will stop and will resume at the next schedule. This operation may take some time.
To remove the backup agent from a computer,
- Hover on the computer you want to remove the backup agent and click
 .
. - Select 'Remove Backup Agent'.

- Click 'Remove Agent'.

Note: If the backup agent on the remote computer is removed using the control panel, it will still show available for backup but data will not be backed up. If you wish to backup the remote computer again, you must remove it from the Computers list, configure it again for remote access, and then enable backup.
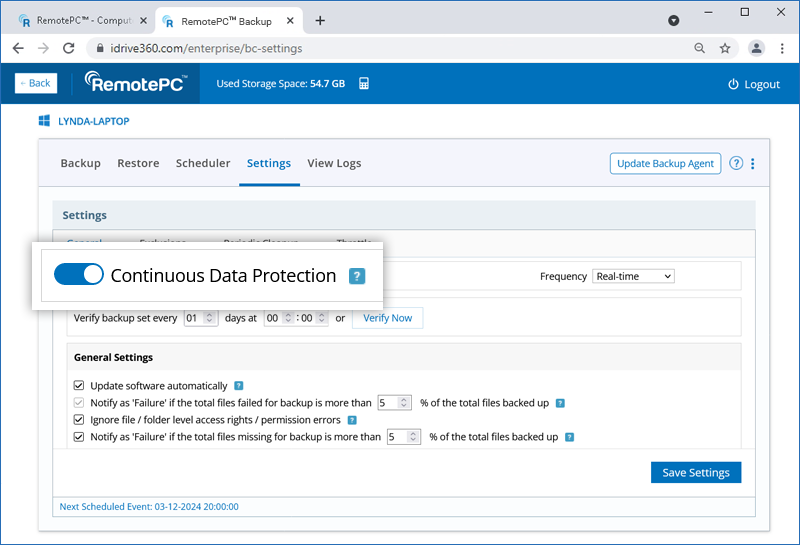
The Continuous Data Protection (CDP) feature automatically recognizes the changes made to the files in your backup set and starts the backup operation in near real-time. The temporary files, system files, network / mapped/external drives are excluded from the operation.
To enable CDP for your computer,
- Sign in to your RemotePC account.
- Go to 'Backup'.
- Click on the computer for which you want to enable CDP.
- In the backup console, go to 'Settings' > 'General'.
- Enable 'Continuous Data Protection' and set the frequency. Click 'Save Settings'.
To verify your backup set,
- Sign in to your RemotePC account.
- Go to 'Backup'.
- Click on the computer for which you want to enable CDP.
- In the backup console, go to 'Settings' > 'General'.
- Enter the required interval and desired time for verifying the backup set.
Snapshots provide a historical view of your data set, stored in your Remote Backup account, enabling point-in-time recovery. They are particularly useful if your files are corrupted by malware and you need to restore them to a previous recovery point.
A daily snapshot is automatically captured for the entire backed-up data of a computer at that specific point in time. IDrive® 360 provides snapshots up to 90 days. Contact support in case you require snapshots older than 90 days.
To perform a snapshot-based restore,
- Sign in to your RemotePC account.
- Go to 'Backup'
- Click on the computer for which you want to enable CDP.
- In the backup console, go to 'Restore' > 'Snapshots'.
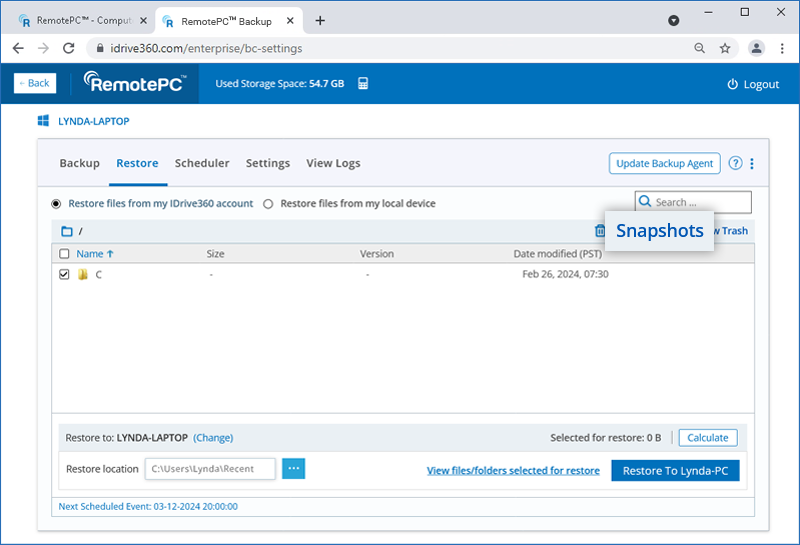
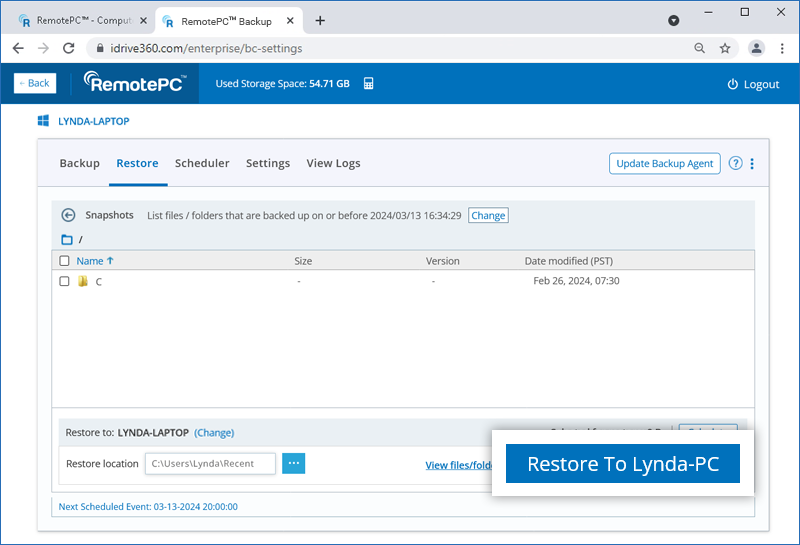
- Select the date and time and click 'Submit'. A list of all the data backed up on or before the selected date appears.
- Select the required files / folders.
- Choose the computer and the restore location where you wish to restore your files / folders.
- Click 'Restore to <computer name>'.
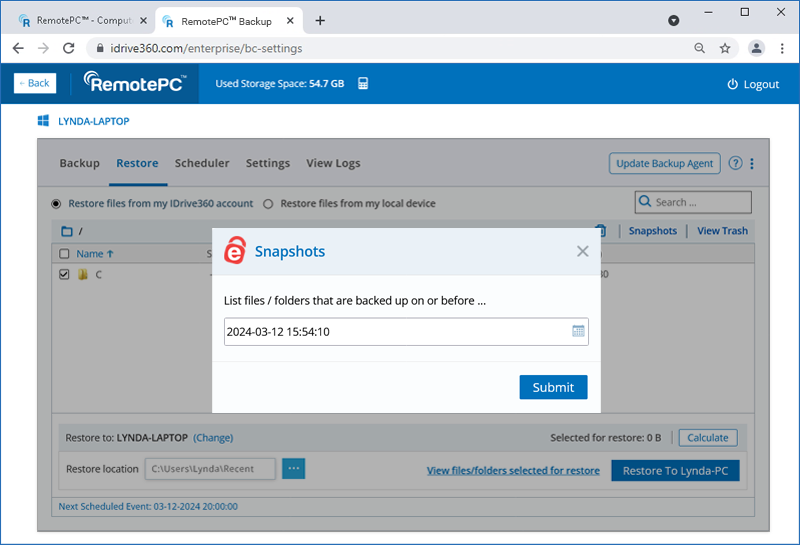
To restore a specific version of the file,
- Right-click on the file you want to restore.
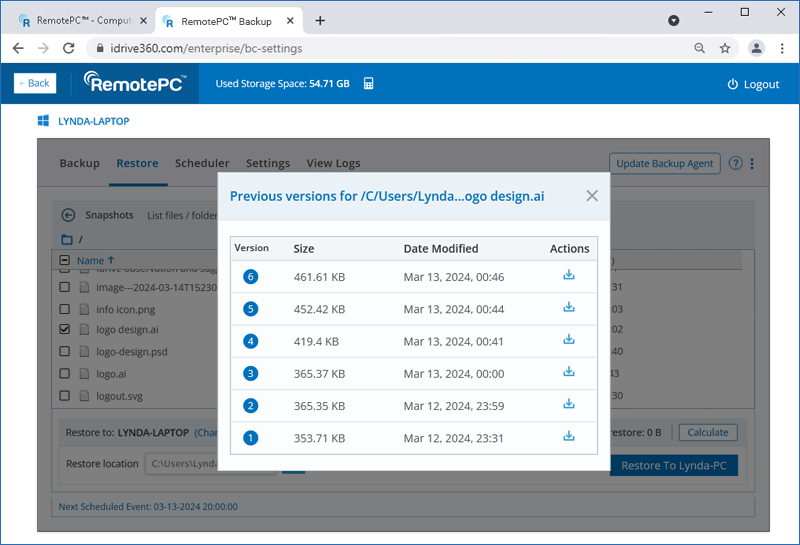
- Click 'Version' to see all available versions of the file.
- Click
 next to the version you want to restore.
Note: The snapshot-based restore functionality applies only to accounts created/devices added on or after 03-05-2024.
Yes, you can backup all your mapped / external drives.
To backup your mapped / external drives,
- Click
 against a configured computer and select 'Manage Backup'.
 - Navigate to the 'Devices' tab in the backup console.
- Hover over the computer where the mapped / external drives are connected, and click
 . The remote management console appears.
 - Click 'Change' and select the mapped / external drive connected to your computer, for backup.
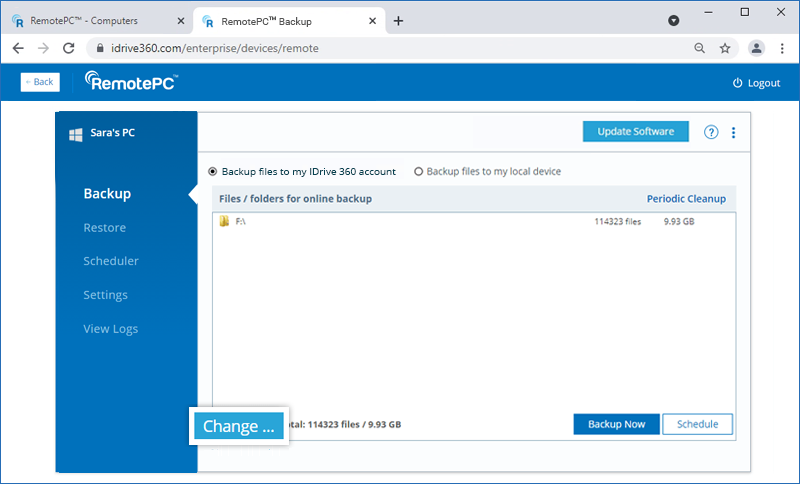
- The selected drive appears under the 'Mapped and external drive files for online backup' section.
- Click 'Backup Now'.
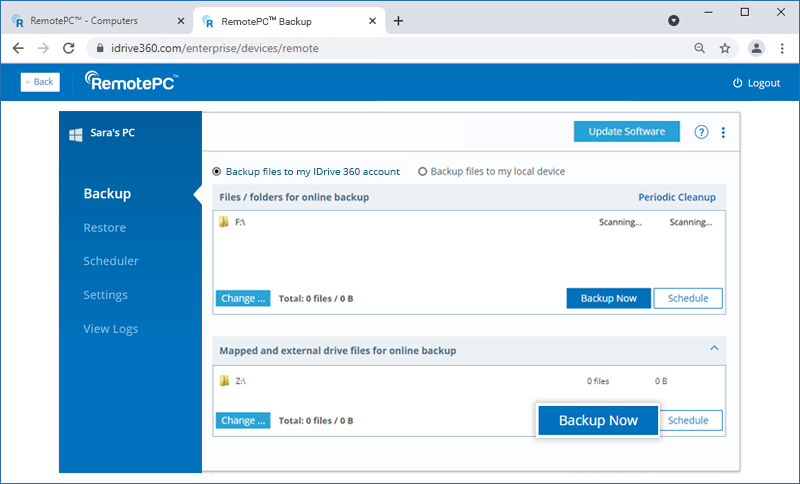
Note: The mapped / external drives must be available at the time of backup.
To restore your backed up data,
- Click
 against a configured computer and select 'Manage Backup'.
 - In the backup console go to the 'Devices' tab, hover over the computer you wish to restore and click.
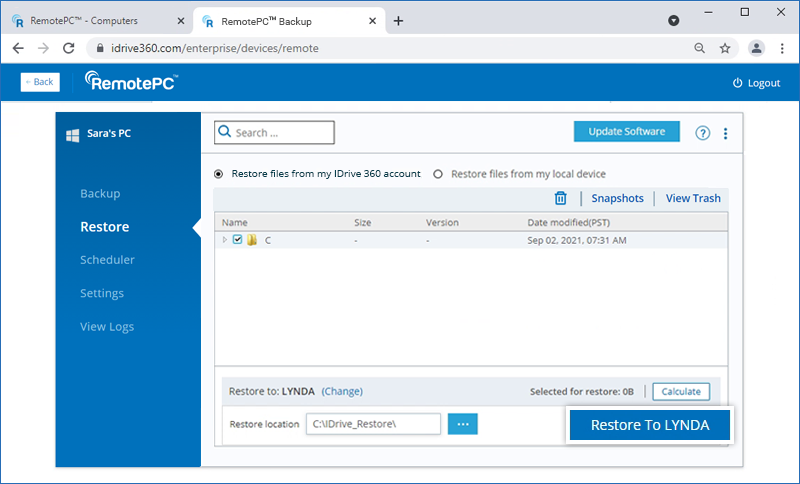
- Go to the 'Restore' tab. If you had set a private encryption key while signing in to the application for the first time, then provide the same.
- Choose 'Restore files from my RemotePC account' if you want to restore files from the cloud or select 'Restore files from my local device' if you want to restore files from a local device.
- Select the folder(s) to restore.
- Click to choose a restore location on the local computer.
- Click 'Change' if you want to perform the restore on a different computer. Choose the desired machine and click 'Yes'.
-
Click 'Restore to <computer name>'.
Admin of RemotePC account can update / reinstall the application for all users or particular groups.
To update / reinstall application,
- Click
 against a configured computer and select 'Manage Backup'.
 - In the backup console go to 'Settings'.
- Click 'Update software automatically'.
- Click 'Save Settings'.
Yes, you can view, schedule as well as download reports of your backup / restore operations.
To view reports,
- Click
 against a configured computer and select 'Manage Backup'.
 - In the backup console go to the 'Reports' tab.
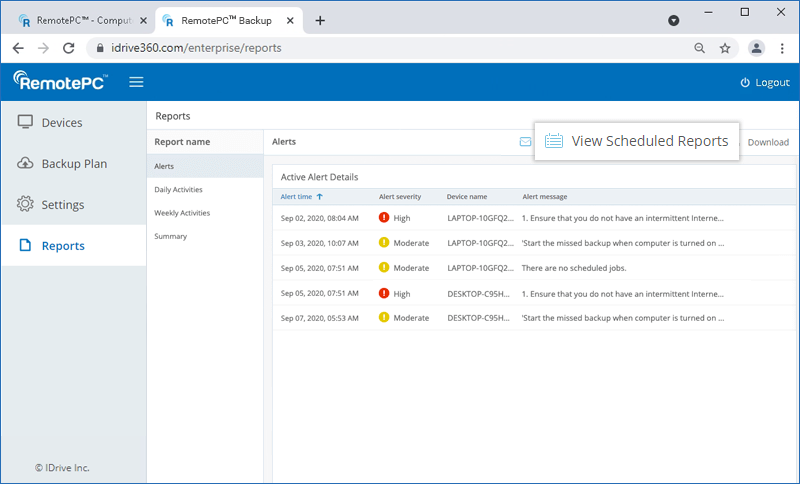
- You can view alerts, and reports based on duration:
- Alerts - Choose the Alerts tab to view the active alerts details
- Daily Activities - View the daily account activities
- Weekly Activities - View the account activities, based on per week
- Summary - Choose the Summary tab to view the overall activity summary
To download reports, click 'Download' and select PDF or Excel format to save the file.
You can schedule and send the reports of your backup / restore operations on a daily or weekly basis.
To schedule and send the report through email,
- Click 'Email Report'.
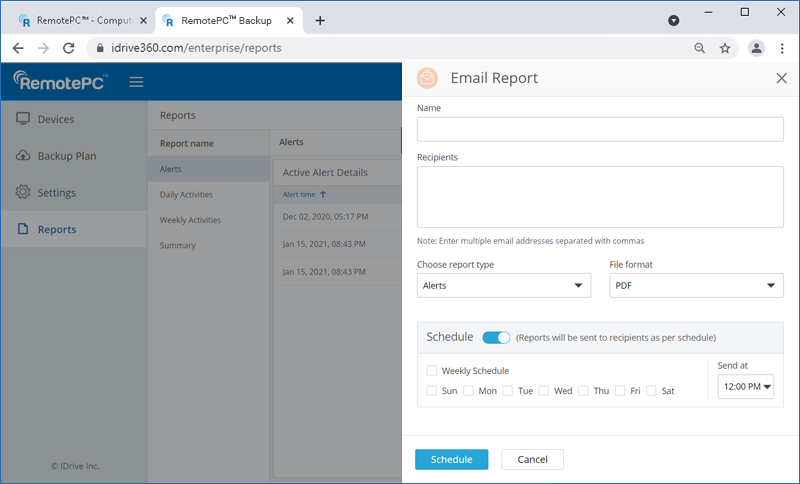
- In the window that appears, enter the name and email addresses of the recipient(s) and choose the report type and the file format for the report.
- Click 'Send'.
or
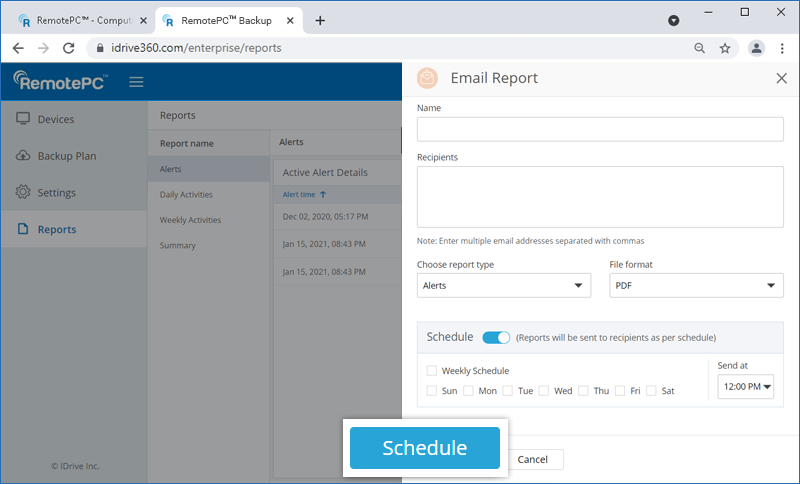
Enable the 'Schedule' button to select the day and time to schedule the reports. Click 'Schedule'.
You can view all the scheduled reports under the 'View Scheduled Reports' section. You can also edit or delete the scheduled reports.
To view and modify a scheduled report,
- Click 'View Scheduled Reports'. All the scheduled reports will be listed.
- Hover on the report name you wish to edit and click
 . Make the required changes and click 'Save' to save the changes.
 - To delete a particular report, hover on the same and click
 . Click 'Delete' in the confirmation pop that appears.