Deploy RemotePC via Apple Remote Desktop
Install the RemotePC application on multiple Mac computers in your organization via Apple Remote Desktop configured on administrator's computer, remotely.
Using the RemotePC mass deployment package, remotely deploy the application on multiple Mac computers or groups in the same network using Apple Remote Desktop software installed on administrator's computer.
To use Apple Remote Desktop, you need Apple Remote Desktop Admin and Apple Remote Desktop client installed on your administrator Mac and client Macs respectively.
Apple Remote Desktop client will be installed automatically during the standard Mac OS installation. However, the Apple Remote Desktop Admin is not a part of the standard installation. You will have to obtain the software from the Apple store and install it on the Mac from which you are deploying the RemotePC application.
Read the detailed steps below to know more about how to deploy the RemotePC package with Apple Remote Desktop.
Prerequisites for remote deployment:
- Login and download the RemotePC mass deployment package on administrator Mac
- Copy the Configuration ID that is applicable for your account
- Apple Remote Desktop Admin software installed on administrator Mac
Configure Remote Management Services on target Macs
For a remote management tool like Apple Remote Desktop to work, the remote management services have to be configured in Mac OS on each individual Mac. In order to do so, you need to log in to each Mac and perform the following steps:
- In Mac OS, open 'System Preferences' > 'Sharing' and select 'Remote Management' under the service list.
- Click 'Options' and select the following options:
- Click 'OK' and close the 'System Preferences' window.
Configure Remote Management Services on admin Macs
Step 1: Add target Mac machines
In order to configure remote management services on the admin Macs, you need to first add the target Mac machines in which you wish to install the RemotePC application.
To add target Mac machines,
- Open the Apple Remote Desktop Admin software installed on your administrator Mac.
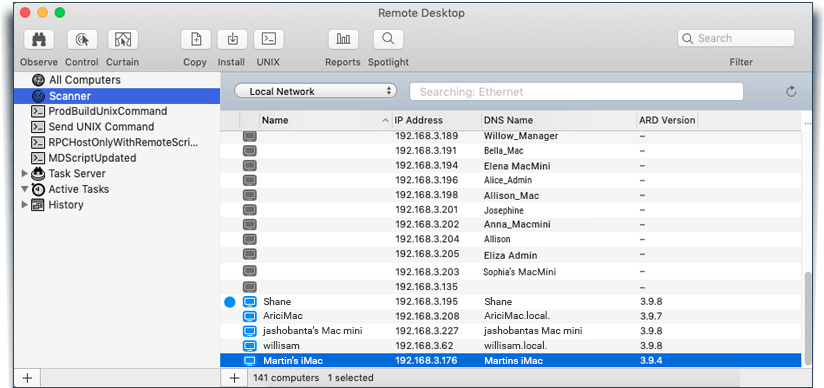
- Navigate to the 'Scanner' tab and select 'Local Network' from the drop-down.
- From the computer list that appears, select and drag the target machines which you wish to add to the 'All Computers' tab.
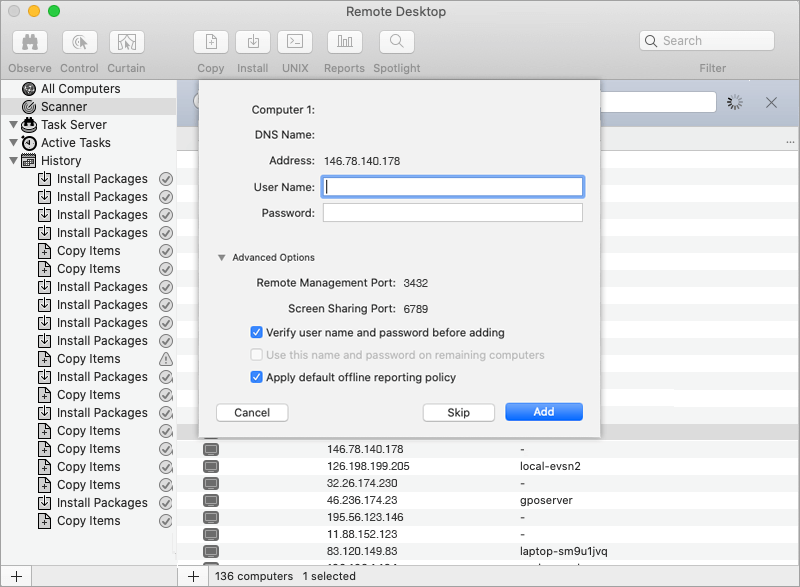
- Enter a valid system credential and click 'Add'.
Step 2: Copy files to target Mac machines
Once the target Mac machines are added to the Apple Remote Desktop software, you can copy the package and script files to the target Macs.
To copy the files,
- Open the Apple Remote Desktop Admin software installed on your administrator Mac, and click the 'All Computers' tab.
- Select the desired destination Macs, and click the 'Copy' button in the Apple Remote Desktop toolbar.
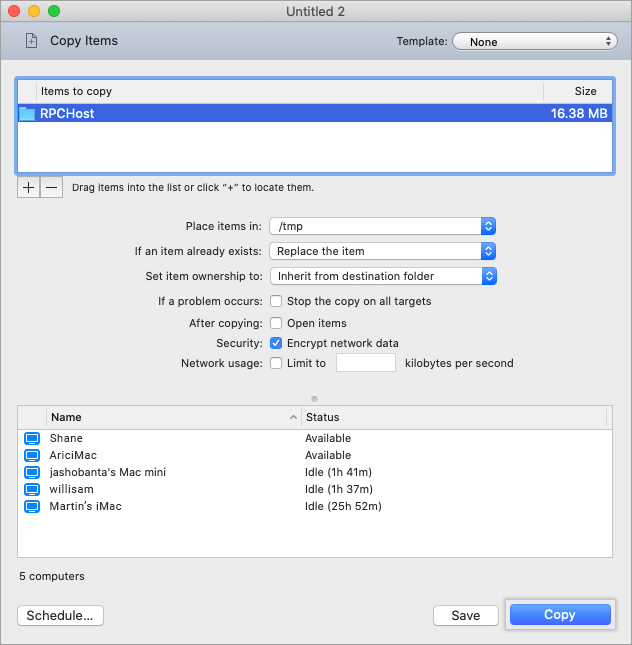
- In the 'Copy Items' window that appears, add the RPCHost folder to the 'Items to copy' list either by dragging it there with the mouse or by locating the file using
 button.
Note: You need to first unzip the downloaded RPCHost.zip folder before copying. - Under the 'Place items in' drop-down, select 'Specify full path' and enter the path as /tmp.
- From the 'If an item already exists' drop-down, select 'Replace the item'.
- Click 'Copy'.
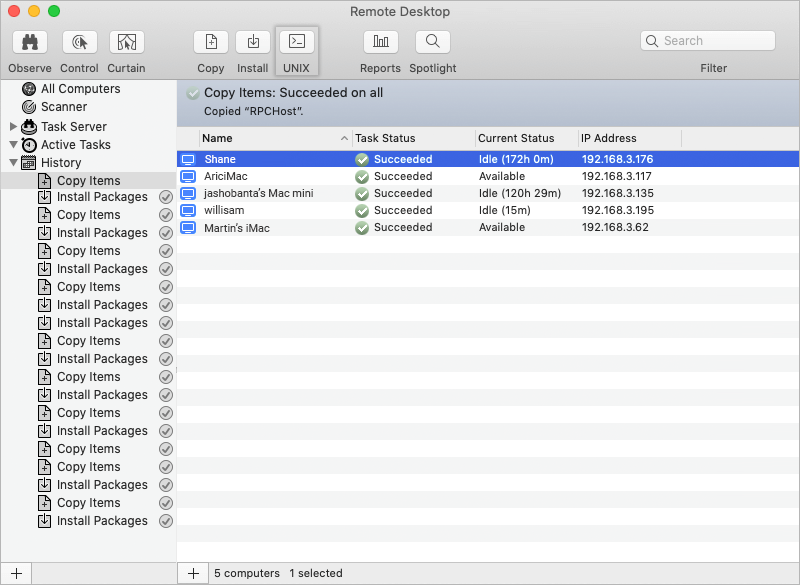
A success message will appear once the files are copied.
Deploy RemotePC package
To deploy the RemotePC package to Mac,
- Open the Apple Remote Desktop Admin software installed on your administrator Mac, click the 'History' tab and select the 'Copy Items' entry in the top of the list.
- Select the desired destination Macs on which the copy operation is successful, and click the 'UNIX' button in the Apple Remote Desktop toolbar.
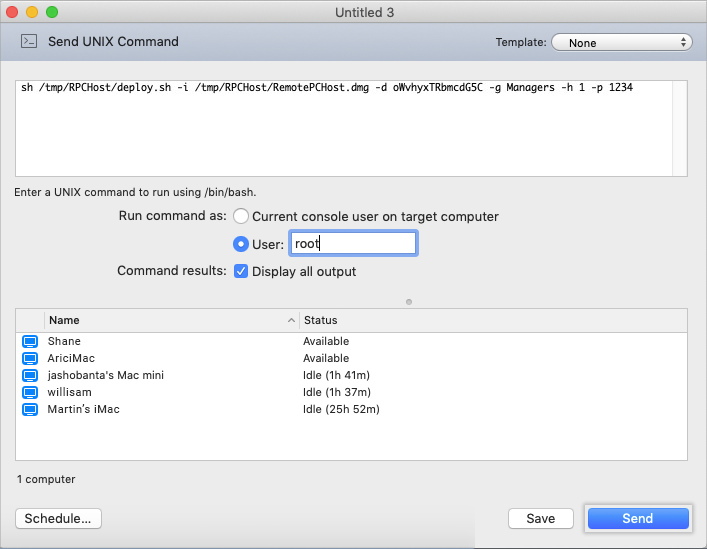
- In the UNIX command window that appears, copy and paste the following command:
sh /tmp/RPCHost/deploy.sh -i /tmp/RPCHost/RemotePCHost.dmg -d Configuration_ID
To include options like group name, hide tray, personal key and connection request permission, follow the below command:
Note: The group name, hide tray and personal key are optional parameters. You may ignore a particular parameter, if you do not wish to configure the same. In such cases, the default settings will be considered.
sh /tmp/RPCHost/deploy.sh -i /tmp/RPCHost/RemotePCHost.dmg -d <Configuration_ID> -g <Group_Name> -h <Hide_Tray_Icon> -p <Personal_Key> -a <Connection_Request_Permission>
Example:
sh /tmp/RPCHost/deploy.sh -i /tmp/RPCHost/RemotePCHost.dmg -d oWvhyxTRbmcdG5C -g Managers -h 1 -p 1234 -a 0Parameters Description -d <Configuration_ID> This is a mandatory parameter and you can find it under Deploy Package > Group deployment via MSI > Configuration ID in your RemotePC account -p <Personal_Key> Set a 'Personal Key' for the remote computer -g <Group_Name> Name of the group in which the computer will be assigned * -h <Hide_Tray_Icon value> 1 Enabling this option will prevent users from accessing the tray options on their remote computers 0 Unhide tray and allow users to access tray options -a <Connection_Request_Permission value> 0 Connection request permission is disabled 1 Automatically decline connection in the login screen after the request expires 2 Automatically allow connection in the login screen after the request expires 3 Allow connection after the request expires Note:
- A group name can contain maximum upto 20 characters and should not contain any special characters.
- The private key length can vary from minimum of 3 characters to maximum of 15 characters.
- Select the appropriate check-boxes to enable the below options:
- Run command as: Select 'User' and enter 'root' in the text box
- Command results: Display all output
- Click 'Send'.
A success message will be displayed once the application is installed.
Note: Mac OS Mojave or later requires user consent for applications to access privacy sensitive data and to record the content of the screen. Hence you need to grant accessibility, screen recording and files and folders permissions to RemotePC. Know more >
